Unreal Engine Audio Primer Tutorial Asbjoern Andersen


Ready to start working with sound in Unreal Engine? Here, Dave Raybould — Senior Lecturer at Leeds Beckett University & co-creator of the Ambient and Procedural Sound Design course on the Epic Online Learning site — shares this hugely useful primer, complete with video guides:
A primer by Dave Raybould
Please share:
 
So, you’re wanting to get started with audio in Unreal..? Not sure where to start..? This article will provide you with a quick primer to get you up and running with sound in Unreal fairly quickly:

We’ll cover the basics of getting sounds into the engine, and then how you can get a functioning ambience going, with looping sounds, distance attenuations, spatializations, randomly timed one-shots, reverbs, and basic interactions.

All of which should stand you in good stead for creating interesting and compelling sonic environments that can help bring your game world to life.


Importing Your Sounds

The first step along the way to becoming an Unreal audio wizard is to be able to get your sounds in to the engine. Now, thankfully, this is actually pretty simple!

It’s probably worth creating a folder within your project’s structure for your sounds to make organizing things a little easier – simply right-click in the Content Browser and select ‘New Folder’

Unreal supports mono, stereo, 5.1, and ambisonic files, a few file formats (wav, aiff, flac, ogg vorbis), any sample rate, and a bit depth of 16bits (that last one is non-negotiable).

There are 2 ways to get your sounds into Unreal – with both methods you can import multiple files:

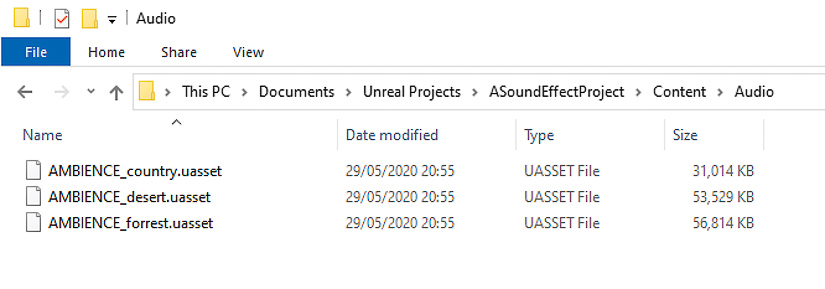
1. You can use the ‘Import’ button in the Content Browser, and then navigate to the sounds you want to import
2. You can simply drag and drop your sounds from Explorer (or Finder if you’re on Mac)


Unreal Engine Audio Tutorial: Importing Sounds


Importing sounds

Once you’ve got your sounds in to the Content Browser, you’ll notice that they’re marked as ‘dirty’ with a little asterisk on their icons. This means you need to save the assets that Unreal has generated otherwise they’ll be lost when you close the project.

It’s worth noting that the sounds themselves are not moved or copied into your project – Unreal generates a .uasset file for each sound as you import it.

UE-audio-tutorial-01

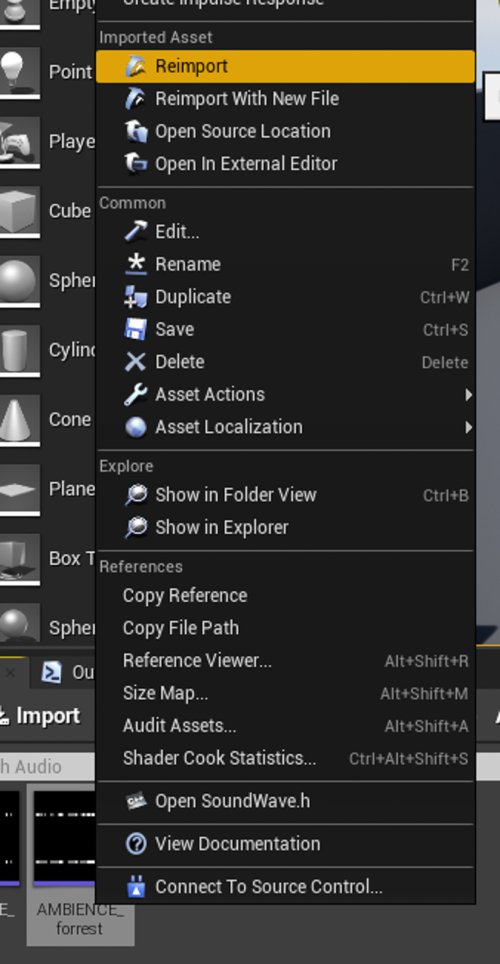
If, at a later stage you decide that you wanted to rework one of the sounds that you’ve imported, then once you’ve edited the original source sound, you can right-click the asset within the Content Browser, and ‘Reimport’ the original source – you can also replace the asset with a new file (again maintaining all your references) by using the ‘Reimport with New File’ option. This means that any references to that asset within your project automatically update and your new sound is used throughout your project – which is handy!

UE-audio-tutorial-02

About Dave Raybould:

Dave Raybould – the author of this primer – literally wrote the book on game audio implementation, and he’s co-created Ambient and Procedural Sound Design course on the Epic Online Learning site. Also, check him out on Twitter @TheNewTeed


Area Loops

Area loops are generally used to provide the background to an area or space – think of these as the underlying bed of your game’s sound – akin to ‘room tones.’ You probably want these to be at least stereo sounds (or quad, or higher, if you’re working in multi-channel), this will help your space feel more believable as there will be some inherent width to your sound already. You’re also going to need to ensure that your sounds will loop properly within your DAW (there are plenty of guides out there on how to do this in all flavours of DAWs). When designing your area loops, you probably want to keep them relatively simple, as anything ‘interesting’ that pops out will do so each time the sound loops round, and this can become noticeable.

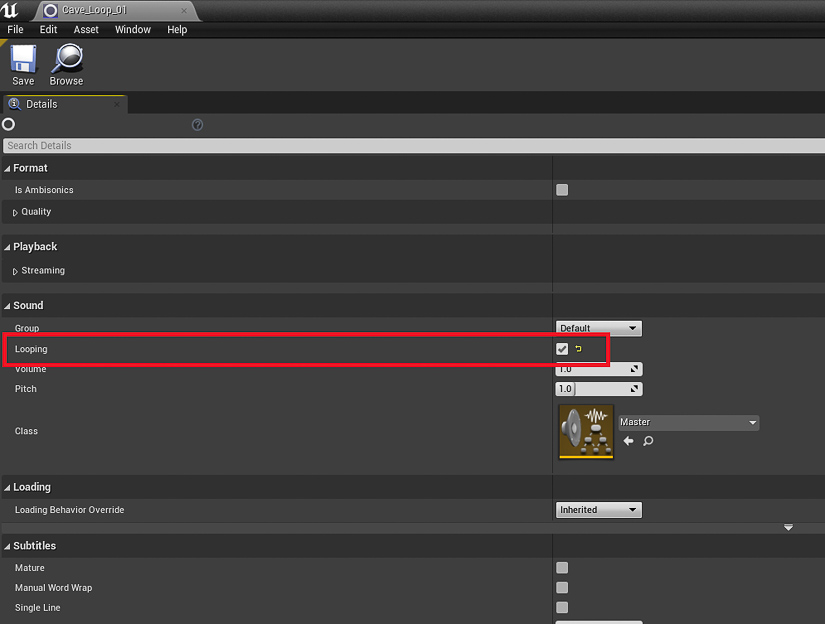
Once you’ve got your area loop sounds in to Unreal, you’ll need to either double-click the asset, or right-click and select ‘Edit.’ In the Details window that opens up, you’ll need to enable Looping so that your sound loops within the game.

UE-audio-tutorial-03

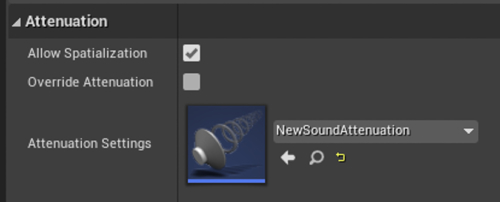
You can then simply drag your sound from the Content Browser into your level to create an AmbientSound actor that references your sound. You can use the Attenuation Settings to ensure that the sound can be heard across the entire area you want it to be. It is possible to create separate attenuation assets that can be re-used across multiple sounds, but for the sake of speed, we’ll just use the ‘override’ settings in the AmbientSound actor itself.

With the newly created AmbientSound actor selected, scroll through the Details window to the Attenuation section, and enable the Override Attenuation property.

UE-audio-tutorial-04

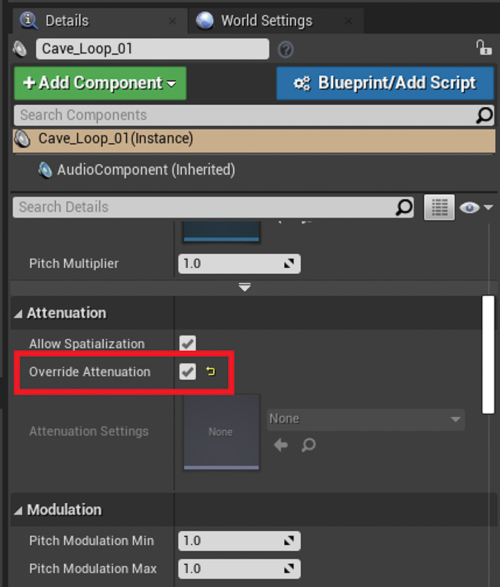
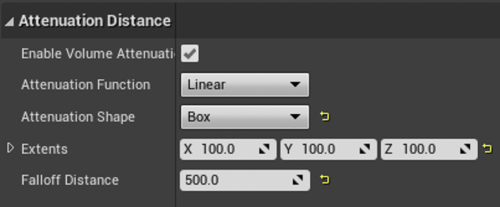
Now, you’re able to use the properties within the Attenuation Distance section to define how much of an area the sound will cover.

(For a full breakdown of the attenuation settings, you can check out the official Unreal Engine Documentation online)
[tweet_box]How to Quickly Get Started With Game Audio in Unreal Engine — an essential primer[/tweet_box] 
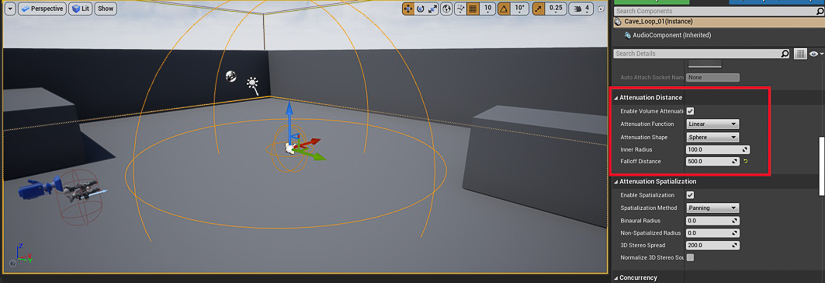
In the image below you can see an AmbientSound actor with a Sphere Attenuation Shape and two orange spheres within the editor that depict the Inner Radius and the Falloff Distance. The Inner Radius defines the distance within which the sound will be at full volume, and the Falloff Distance defines the distance at which the sound will be fully attenuated and will stop playing. The Attenuation Function defines how the engine handles this attenuation over distance, in this case it’s using a Linear function.

UE-audio-tutorial-05

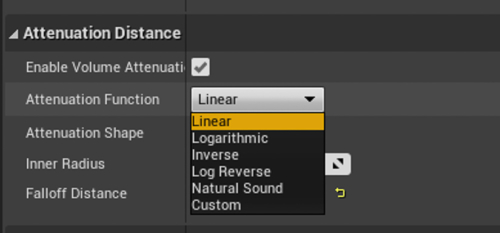
You can choose from a range of Attenuation Functions – it’s worth experimenting with these to find the one that best suits your sound and usage.

UE-audio-tutorial-06

You can also choose from a range of Attenuation Shapes – it makes sense to use the shape that best suits the area you want to cover with your sound.

UE-audio-tutorial-07

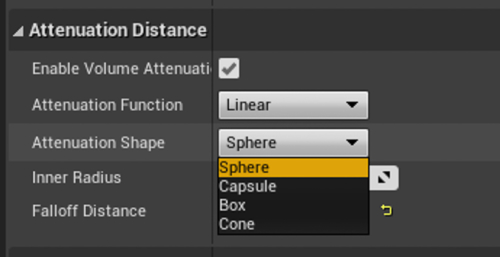
If you use a different shape than Sphere, the distance properties will change – for example, if you use a Box shape, then you get an Extents property instead of the Inner Radius, which makes sense given the shape.

UE-audio-tutorial-08

For area loops, it makes to set your ‘inner’ distance (that which defines the full volume area) to be roughly that of the space you want to cover, and then you can use the ‘outer’ distance (falloff) to give you a ‘transition’ area as you move between different spaces.

In this video there are two hypothetical spaces (a cave and a jungle) – they’re both just simple boxes for the purposes of demonstration, but you’ll see how the inner attenuation distance has been set to roughly cover the entire space, and then the outer distance is being used to transition between the two spaces.


Unreal Engine Audio Tutorial: Area Loops


Area Loops

One other thing that you should bear in mind is whether you want your area loops to be spatialised within the game. This is entirely your choice, but the general rule is that they should not be spatialised (the sounds in the video above are not spatialised) – this means that the sounds will appear to just ‘exist’ in that space and not come from a specific location, and so won’t pan as the player moves around. Having area loops that are spatialised can feel disconcerting.

You can switch spatialization on and off using the Enable Spatialization property within the Attenuation Spatialization section (we’ll look at this section and its settings in the Source Loops section later).

UE-audio-tutorial-09

This video gives a quick demo of the difference between spatialised and non-spatialised area loops.


Unreal Engine Audio Tutorial:  Spatialization Comparison


Spatialization Comparison


Popular on A Sound Effect right now - article continues below:


Trending right now:

  • Destruction & Impact Sounds Cataclysm Play Track 1482 sounds included $156

    Cataclysm is a vast collection of recorded, synthesized and designed sounds created to support important destructive moments and add a stronger sense of extreme consequence to any sound.

    The recorded section of library features elements such as flash powder explosions, propane cannon blasts and artillery cannons recorded in unique natural environments with violent transients and lush, long and varied tails. It also features falling trees, forge burners, large trebuchet wood groans, rock smashes as well as more ordinary items recorded and designed to feel like an over the top version of themselves such as vacuum cleaner suctions, metal vase holders, ground pounders and more.

    The synthesized section of the library features equally rich textures in the form of explosion sweeteners, other-worldly environmental reflections, scorching energy risers and more.

    Finally, recorded and synthesized content was employed to develop the designed section, where the hyperrealism of the recordings meets the clean yet aggressive textures of the synthesized section in catastrophic assets themed around the library’s title.

    Bonus: Two extra libraries included for free:
    This library also includes two additional releases from Mattia Cellotto - for free: Crunch Mode delivers 230 crunchy sounds made with a variety of vegetables, fresh bread, pizza crust and a selection of frozen goods. The Borax Experiment gets you 158 squishy, gory, slimy and gooey sounds.
    20 %
    OFF
    Ends 1715637600
  • Western Black Powder Guns is a collection of 19th century firearm sounds, created by sound designer Barney Oram. It features 496 sounds in total, including 440 multichannel source sounds and 56 designed sounds, supplied in 192kHz 24bit WAV file format.

    This library contains a selection of classic Wild West style weapons, including; Colt 1851 Navy Revolver, Pattern-Enfield 1853 Rifle, Snider-Enfield 1861 Artillery Carbine, Winchester Model 1887 Shotgun and more.

    Recorded on a private shooting range in the UK, this library features multi-mic coverage and a range of distance positions captured on all included source content. Microphones used include; Schoeps, Sennheiser, Neumann, AKG and DPA, captured with recorders such as Sound Devices, Zoom, Sony, and more.

    In addition to source recordings, Western Black Powder Guns also contains a generous designed section, lovingly crafted to be of immediate use to sound designers. The designs are an homage to the classic gun sounds of Western movies, mixed with a tight and punchy modern edge.

    This library includes detailed SoundMiner metadata and utilizes the UCS system for ease of integration into your library.

    Behind the Scenes Video:


    Western Black Powder Guns Sound Library - Behind the Scenes


  • Game Audio Packs Warfare Sounds Play Track 2492 sounds included $28

    WARFARE SOUNDS is a massive collection of 2492 professionally recorded, edited and designed sound effects.  Including guns, bullet flybys, bullet impacts, silenced guns, explosions, footsteps, Foley, nature ambiances and more!

    WARFARE SOUNDS contains sounds from our other sound packages, including:

    Gun Sound Pack
    Bullet Impact Sounds
    Silenced Gun Sounds
    Explosion Sound Pack
    Footstep and Foley Sounds

    Plus additional content from Pro Sound Collection! This is the ultimate sound package for anyone working on a military type film or game.  Perfect for an FPS or any type of shooter.

    ALL sounds from WARFARE SOUNDS are already included in our full package Pro Sound Collection. So if you need more sounds. Be sure to check it out before purchase.

    28 %
    OFF
  • Materials & Texture Sound Effects Glacier Ice Play Track 300+ sounds included $32

    Glacier Ice is a library containing over 300 high quality sounds of ice cracking, breaking, shattering in various sizes of blocks – recorded entirely in the Italian Alps over the course of two winters.

    The library contains sounds of all dimensions, from ice cubes being dropped in a drink to a designed iceberg collapsing.

    The majority of the material was recorded at 192 KHz with a Sanken CO100K and a stereo pair of Sennheiser MKH8040, making this library greatly flexible for pitch shifting and all sorts of heavy processing.

    A small section recorded at 96KHz features sounds recorded exclusively with contact microphones placed directly on the surface of a frozen water stream.

    Bonus: Two extra libraries included for free:
    This library also includes two additional releases from Mattia Cellotto - for free: Crunch Mode delivers 230 crunchy sounds made with a variety of vegetables, fresh bread, pizza crust and a selection of frozen goods. The Borax Experiment gets you 158 squishy, gory, slimy and gooey sounds.
    20 %
    OFF
    Ends 1715637600

Latest releases:

Need specific sound effects? Try a search below:


Source Loops

Source loops are the sounds for specific objects / things in your world (but obviously, only those that would produce a looping sound – we’ll cover ‘non-looping’ objects next…). For example, there might be a generator-like machine within one of your spaces, or a waterfall in an outdoor space. These sounds would typically be mono, but you could use stereo if the object is large and you want to embed some natural width to the sound. Again, as with area loops, you’re going to need to ensure that your sound loops correctly.

Once you’ve got your sounds into the engine, and have edited the assets to make them looping sounds, you can drag them into the editor and position them in the same world location as your visual asset.

UE-audio-tutorial-10

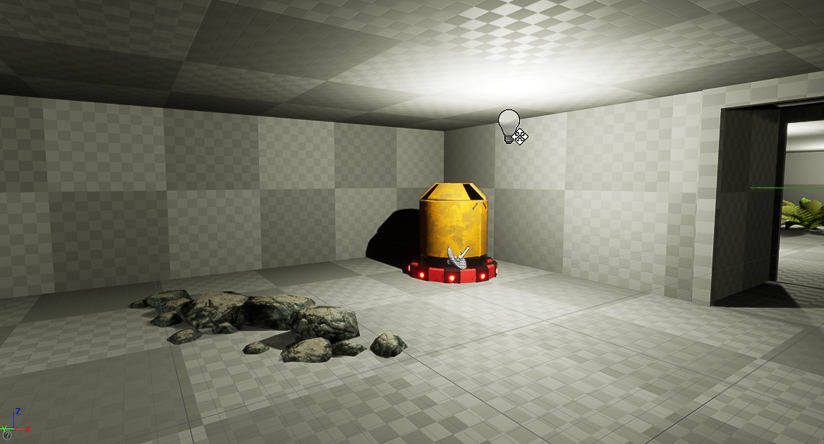
Now you can set up your attenuation settings to create the falloff behaviour you want from you sound, in terms of how far your sound should be audible as you move away from the object. The most typical Attenuation Shape for use with source loops would be Sphere as this emulates how sound propagates in the real world, but other shapes are available – choose the one that best suits the intended purpose and behaviour of your sound. The same goes for the Attenuation Function – choose the one that sounds best for your sound and situation.

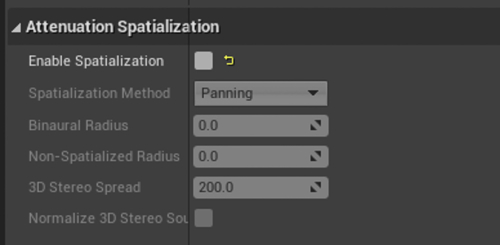
Given that we want our source loops to actually come from the object that is producing the sound, we want to make use of the Spatialization settings, and so you’ll need to set the Enable Spatialization property to true.

UE-audio-tutorial-11

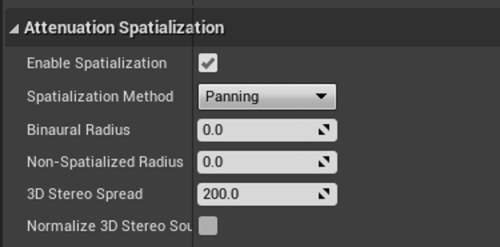
This then allows you access to the settings that determine how the sound will be spatialized within your game. There are 2 Method options available within the Unreal engine by default:

UE-audio-tutorial-12

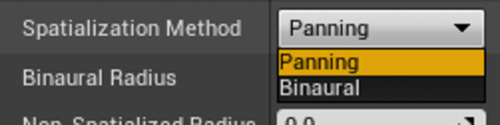
If your game is going to be played on speakers (at any point), then you’re probably best off leaving the option set to Panning, but if you know that your players will be using headphones, you can make use of the Binaural option.

It’s worth experimenting with the Non-Spatialized Radius property, particularly if your object/sound is supposed to be quite loud and enveloping when up close – this can help reduce the sense of ‘sudden flipping’ that can occur when a point source sound moves across the player’s position (either because the sound itself is moving or because the player moves). This property defines a distance within which the sound will start to transition from fully spatialized (outside this distance) to being fully non-spatialized (at the sound’s origin).


Unreal Engine Audio Tutorial: Non-Spatialized Radius


Non-Spatialized Radius

Something to think about with source loops is the use of multiple AmbientSound actors (each playing a separate sound) to create layers within your sound that come in at differing distances – this can help emulate the fact that different levels of detail are audible within sounds at different distances.


Unreal Engine Audio Tutorial: Layering Source Loops Over Distance


Layering Source Loops Over Distance

There are other ways of achieving this same effect, but this is a pretty quick method and gives you quite a bit of control over how the different layers come in and out over distance.

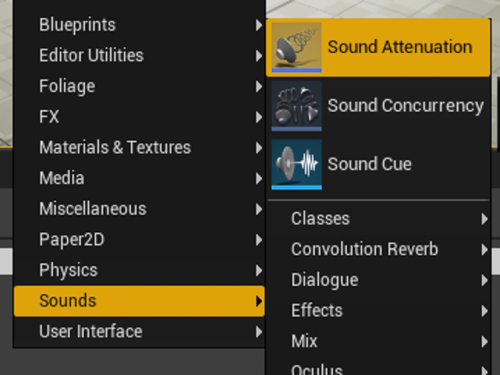
If at this point you find yourself setting up the same sound across multiple objects / locations within your level, you may want to think about creating a Sound Attenuation asset so that you can re-use this and assign it to your AmbientSound actors. To create an Attenuation asset, simply right-click in your Content Browser and go to Sounds / Sound Attenuation.

UE-audio-tutorial-13

You can then open the asset and set up your attenuations and then within the AmbientSound actors assign this to the Attenuation Settings property (you’ll need to disable the Override Attenuation).

UE-audio-tutorial-14


Take things further with the Ambient and Procedural Sound Design course:

The Ambient and Procedural Sound Design course on the Epic Online Learning site was produced by myself and Richard Stevens, and takes you through the principles of audio implementation within the Unreal Engine. We cover topics such as asset management and organization, looping sounds, one shots, attenuations, spatialization, occlusion, and procedural systems for the control and playback of sounds using both Sound Cues and Blueprints. By the end of the course, you should have a good understanding of interactive audio principles, and you’ll have the tool and knowledge to implement effective ambient sound into your games. The course comes with a full game world project that you can download that contains a fully populated level along with an ‘empty’ level (sound-wise) that you can use to follow along with the various techniques as we go.

Learn more about the course here


One Shots

So far, we’ve been using simple looping sounds to create the basis of a space’s sound, but if want to do anything more ‘complicated’ than playing back a single looping sound, then we’re going to need to look at the Sound Cue system – we can use this to create ‘systems’ that govern how sounds are played back within Unreal. For example, we may want to create a system that plays back a randomly selected bird sound at randomly timed intervals – while this may sound like quite a complex thing to build yourself, this can be achieved relatively easily through Sound Cues.

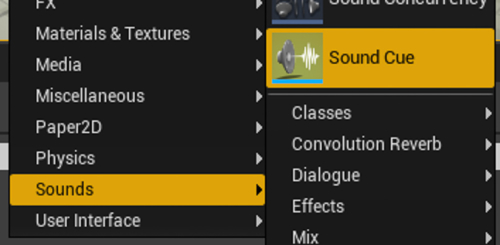
To create a new Sound Cue asset, right-click in the Content Browser, and go to Sounds / Sound Cue.

UE-audio-tutorial-15

You can then double-click the newly created asset to open the Sound Cue Editor.

UE-audio-tutorial-16

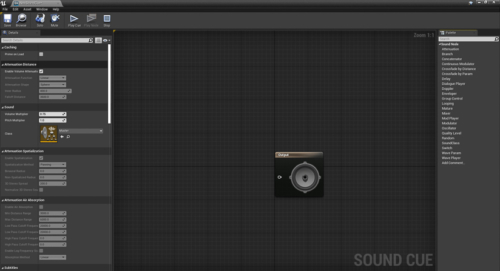
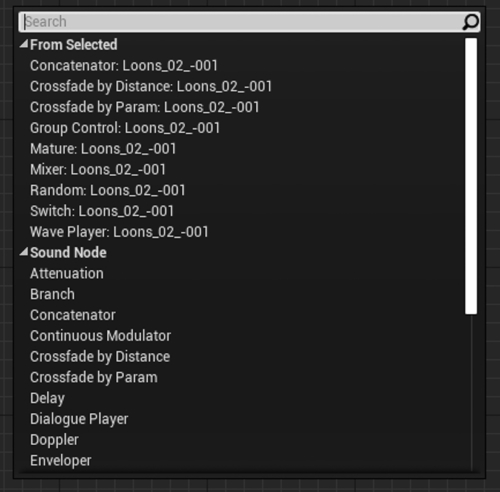
You can add new nodes to the Sound Cue by right-clicking in the empty space and selecting from the available list – if you have one or more Sound Wave assets selected in the Content Browser when you do this, then you get some ‘contextual suggestion’.

UE-audio-tutorial-17

Let’s have a look at how we might create the birds example from above to get a feel for how Sound Cues work…

In the image below, there are 4 different variations of a bird call all connected to a Random node followed by a Delay node, and then a Looping node.

UE-audio-tutorial-18

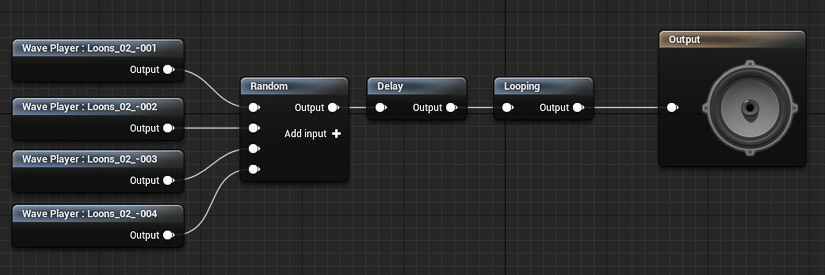
So, when this Sound Cue is activated, the Delay node is triggered which causes the system to pause for a period of time, after which one of the bird calls is randomly selected and played. The system then ‘loops’ and after another pause, another bird sound is selected and played. This continues for as long as the Sound Cue is active – it is the system that ‘loops’ rather than the sound itself that loops.

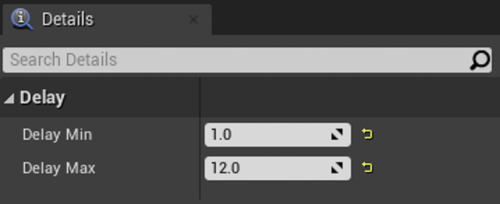
All of the nodes within a Sound Cue have their own unique set of properties, which you can access and change in the Details window. For example, the Delay node allows you to set Min and Max time values, meaning that you could (as illustrated below) create a system that produces a bird call sound at a random time between 1 and 12 seconds.

UE-audio-tutorial-19

Sound Cues can be assigned to AmbientSound actors in the same way as simple Sound Waves, and so they can be placed in the level, and as they are an ‘asset’ they can easily be re-used multiple times. Not only does this make populating your worlds with sound a little quicker, it also means that if you use randomly generated times for the Delay node it can help you to produce non-repeating environments due to the changing combinations of sounds as the player moves around.


Unreal Engine Audio Tutorial: One Shot Sound Cue System


One Shot Sound Cue System


Reverb

Reverb is obviously fairly important for creating a convincing environment, and luckily it’s pretty simple to set up within Unreal – we can define different areas within our level, and assign appropriate reverbs to each one.

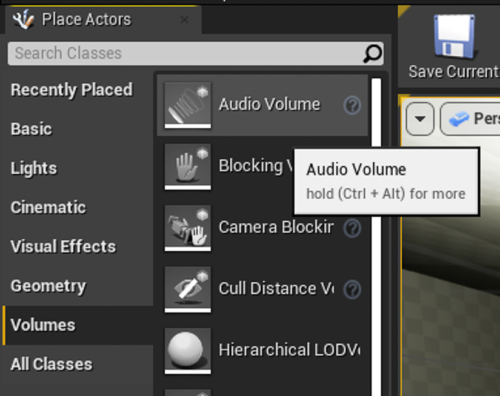
The first step is to create an Audio Volume within the level and set it’s location, shape, and size to match the space. From the Place Actors tab, go to Volumes and drag an Audio Volume into your level.

UE-audio-tutorial-20

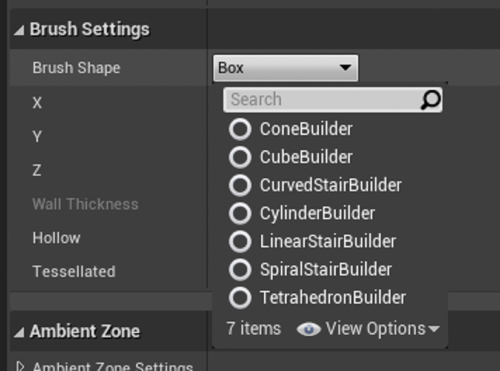
To start with your Audio Volume will just be a small wireframe cube

UE-audio-tutorial-21

You can choose from a few different shapes, but the most typical shapes are Box (CubeBuilder), Cylinder (CylinderBuilder), and Sphere (TetrahedronBuilder). Once you’ve decided on the most appropriate shape, you can then define its size using the remaining properties within the Brush Settings section (these will change depending on the chosen shape).

UE-audio-tutorial-22

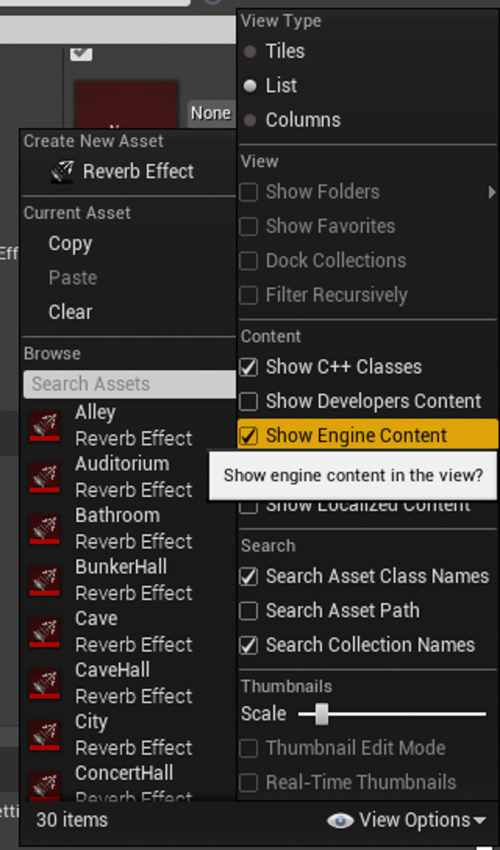
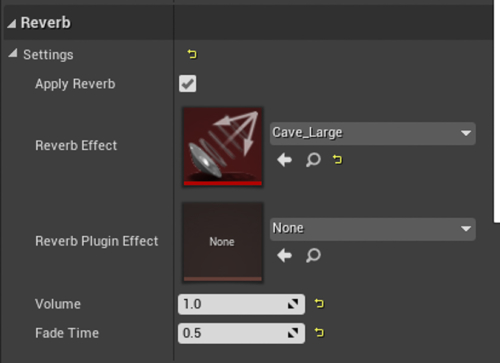
The next step is to assign an appropriate Reverb Effect asset to the Audio Volume – there are a number of different reverbs within the engine (you’ll need to enable ‘Show Engine Content’ in the View Options), or you can create your own.

UE-audio-tutorial-23

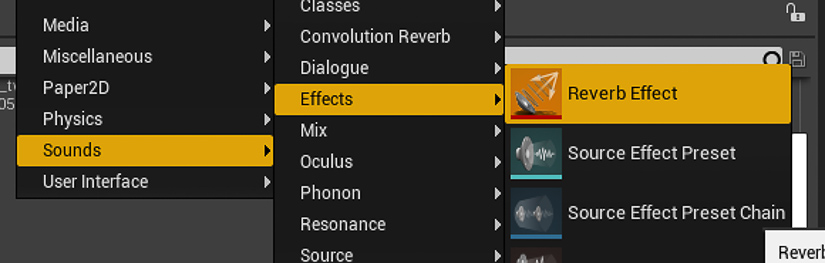
To create your own Reverb Effect right-click in the Content Browser and go to Sounds / Effects / Reverb Effect.

UE-audio-tutorial-24

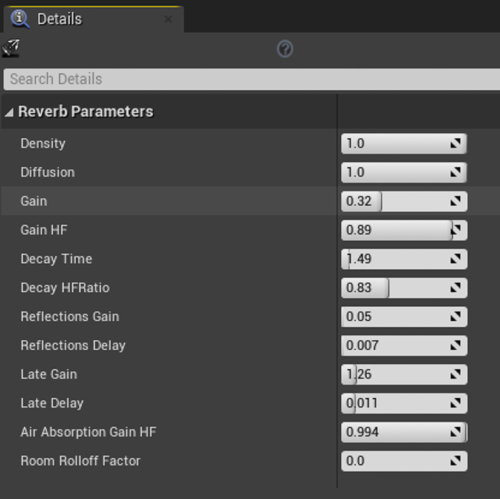
You can double-click the newly created asset to open it to edit the parameters in order to get the most appropriate reverb for your space.

UE-audio-tutorial-25

At this point, you can test out your reverb, but there is one more thing you’ll want to check… As part of the Sound Attenuation settings for every sound, there is an Attenuation Reverb Send section which determines how much of the sound is sent to the current reverb effect based on the distance of the sound to the player. For the majority of sounds, the default settings will be fine.

UE-audio-tutorial-26

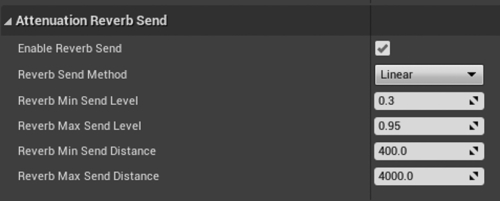
The defaults will produce a drier sound the closer you are to the sound, and a wetter sound as the distance increases (which matches our experience of the real world). However, you may find that for ‘player sounds’, such as weapons and footsteps, you may want to increase the Reverb Min Send Level as these sounds will be very close to the player (if not at the same location) and with the default settings will only have a minimal amount of reverb applied.


Unreal Engine Audio Tutorial: Reverb Over Distance


Reverb Over Distance

The next thing to look at is how we can do ‘nested’ reverbs – there may well come a time when you have, for example, a small cave inside a larger cave. You would likely want to have different reverb effects for the different sized caves, but how does the engine know which reverb effect you want to use? The small cave is inside the larger one, so you’re technically inside of both…

UE-audio-tutorial-27

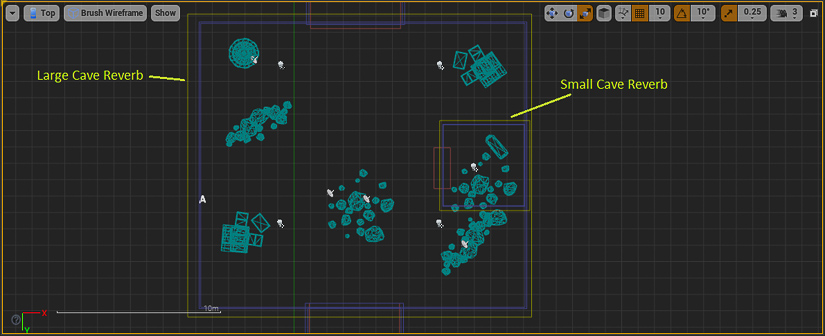
To tell which Audio Volume (and therefore reverb) we want the engine to use we set the Priority within the Audio Volume’s properties. If we are technically speaking inside of multiple Audio Volumes, then the one with the higher Priority setting is the one that will be used.

UE-audio-tutorial-28

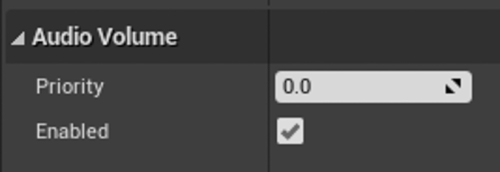
So, in this example, we’d set the Priority of the large cave’s Audio Volume to 0, and the small cave’s Priority to 1. We can then use the Fade Time of the Reverb section of the Audio Volume’s properties to determine the speed of the transition between different reverbs as we move in and out of Audio Volumes.

UE-audio-tutorial-29


Unreal Engine Audio Tutorial: Nested Reverbs


Nested Reverbs


Highlights from A Sound Effect - article continues below:

 
  • Using the popular module format, the 6030 Ultimate Compressor offers ten different compressors. All of these designs are by McDSP – some completely from the ground up, while others are emulations of existing gear with unique variations created by McDSP. Each 6030 Ultimate Compressor module is easy to operate, and yet has enough sophistication for the most discerning professional.

    Whatever your style, from smooth tube emulations to aggressive solid-state designs, the 6030 Ultimate Compressor has a custom-made dynamic range control module that is just right for you.

    Features
    • Unique twists to classic designs in addition to several completely new designs
    • Multiple compression algorithms in a single compressor
    • Side chain support
    • Analog Saturation modeling
    • Double precision processing
    • Ultra low latency
    • Mono and stereo versions

    Formats
    • Native v7: AAX Native, AU, VST

  • The AE600 is the next generation of active equalization. New and unique EQ modes, independent control of fixed and active EQ bands, and an ultra low latency algorithm make the AE600 the perfect solution for any audio production.
    Every fixed and active band in the AE600 has its own gain, frequency, Q, and mode controls. EQ mode options include parametric, proportional Q parametric, 5x Q parametric, Baxandall shelving EQ, vintage styled EQ, X-style shelving EQ, Baxandall shelving EQ plus filtering, and high and low pass filtering. All bands are completely overlapping and can use the input signal or selected side chain inputs to trigger the active EQ response. The active EQ bands can be controlled via the response plot itself, or from the text readouts above and below the response plot.
    The AE600’s active EQ response is determined by each band’s threshold, attack and release settings. Additionally, a ratio control determines input signal level sensitivity to further articulate how the active EQ will reach maximum active equalization – a feature unique to the AE600 (and AE400) active equalizers by McDSP.
    Peak signal text readouts for each active EQ band’s key signal allow quick setup of each band’s active EQ threshold, and are located underneath band dynamics plots. Input and Output controls, individual band bypass, band control linking, and band key signal monitoring round out the features of the AE600.

    Features
    • Six fully overlapping fixed and active EQ bands
    • Independent control over all fixed and active EQ parameters per band
    • Selectable EQ mode per fixed and active bands
    • Unique active EQ ratio response control
    • Side chain support
    • Double precision processing
    • Ultra low latency
    • Mono and stereo versions

    Requirements

    McDSP HD and Native plug-ins are compatible with Pro Tools, Pro Tools HD, Logic 9 and Logic X, Cubase, Nuendo, Ableton Live, MOTU Digital Performer (DP), Studio One, and other DAWs that support AAX, AU, VST, and/or VST3 plug-in formats. McDSP HD plug-ins also support the Avid S3L and S6L live sound systems running VENUE OS 5.x or later.

    McDSP Native plug-ins support AAX Native, AU, VST, and VST3 plug-in formats. McDSP HD plug-ins additionally support the AAX DSP plug-in format, as well as AAX Native, AU, VST, and VST3 plug-in formats. McDSP plug-ins support Mac OS 10.7.2 or later (Lion), 10.8.x (Mountain Lion), 10.9.x (Mavericks), 10.10.x (Yosemite), 10.11.x (El Capitan), and Windows 7, 8 and 10.

    McDSP plug-ins require an iLok2 USB Smart Key for authorization.

    McDSP AAX plug-ins require Windows 7 or later, Mac OS 10.7.2 or later, and support Pro Tools 10.3.8 or later, 11.1.3 or later, and Pro Tools 12.x or later.

    McDSP AU plug-ins require Mac OS 10.7.2 or later, and support Logic 9 and Logic X, Digital Performer, Ableton Live, and other AU compatible DAWs.

    McDSP VST and VST3 plug-ins require Windows 7 or later, Mac OS 10.7.2 or later, and support Cubase 7.x or later, Nuendo 6.5.x or later, and other VST and VST3 compatible DAWs.

    Formats
    • Native v6: AAX Native, AU, VST

  • FilterBank, McDSP’s first product, is an equalizer plug-in that rivals any analog EQ with its flexible design and substantial feature collection.
    FilterBank can emulate any EQ, or be used to create a distinct custom EQ.

    FilterBank is 3 plug-ins:
    • E606 – parametric, high and low shelving EQ, high and low pass filters
    • P606 – parametric EQ with variable Q modes
    • F202 – steep high and low pass filtering with resonant Q control
    With its unique Peak, Slope, Dip controls and variable Q modes FilterBank can emulate any EQ, or be used to create a distinct custom EQ.

    Features

    • Shelving and Parametric EQ
    • High and Low pass filters with resonance control
    • Unique Peak-Slope-Dip Shelving EQ parameters
    • Variable parametric Q modes
    • Analog Saturation Modeling
    • Double Precision Processing
    • Ultra Low Latency
    • Mono and Stereo versions

    Formats
    • HD v6: AAX DSP/Native, AU, VST

  • Dialog. The focal point of any movie, television show, documentary, or for that matter, any creative media production involving the spoken word. Add to the mix a sweeping musical score, dozens of foley effects, and plenty more – and it becomes clear the job of dialog mixing is a tall order. After all, if you can’t hear what the actors are saying, why watch it at all!!

    The SA-2 Dialog Processor is based on hardware originally conceived by Academy Award winning re-recording mixer Mike Minkler and used on over 100 major motion pictures. The SA-2 is designed to improve the overall sound of recorded speech. But the SA-2 is not just for dialog. It’s equally useful for vocals, and is a great tool for adjusting the timbre of any track, a reliable de-esser, and a fine multi-frequency compressor, in our completely biased opinion.

    The SA-2 Dialog Processor is made up of 5 bands of strategic active equalization, configured in a variety of modes to best address common issues of dialog. Each band of active equalization has a threshold control to determine at what signal level the active equalizer begins to effect the signal. There are also enable buttons for each band to quickly audition the effect of any given band. Two mode selectors – one for controlling the ballistics of the active equalization, and a second for placing the five bands at strategic locations in the frequency spectrum. Finally, there are input and output gain controls for overall adjustment.

    Features

    • Five independent bands of strategic active equalization
    • Multiple process modes for a variety of applications
    • Unique signal reduction metering
    • Double precision processing
    • Ultra low latency
    • Mono and stereo versions

    Formats
    • Native v6: AAX Native, AU, VST

  • Realtime Pitchshifting PlugIn version 2!

    Elastique Pitch is the real time pitch shifting solution for RTAS, VST, AU and AAX. Powered by zplane’s élastiquePro pitch shifting engine which is used by millions of end users around the world, the plugin ensures the highest, program independent pitch shifting quality.

    Elastique Pitch focuses on the essential things: you won’t find any unnecessary or confusing controls or functionality. Instead, the plugin offers you quality, stability, and ease of use.

    In the second edition we´ve added a feedback delay and the infiniSTRETCH function of the new élastiquePro v3 engine. Both make it easy to use Elastique Pitch in a more creative way.

    The key features of Elastique Pitch V2 are:

    • multi channel: support for synchronous pitching of up to 8 audio channels
    • real time: no offline pre-analysis required
    • feedback with delay for more creative usage
    • Three different views
    • Program-independent high quality with the highly-acclaimed élastiquePro v3 engine (speech, single-voiced, classical/popular music, etc.)
    • phase coherence: absolute phase stability between all channels
    • MIDI input: for pitch control
    • formant shifting: shift formants independent from pitch
    • factory presets: for typical film pull-ups/pull-downs
    • AU, VST, AAX and RTAS support for Mac & PC

    technical specifications

    • audio format: 1-8 channels (I/O), 44.1-192kHz sample rate
    • plugin format: AAX, RTAS, AU, VST
    • pitch range: ± 12 semitones = 50-200%
    • timbre range: ± 12 semitones = 50-200%
    • plugin latency: 150ms @48kHz
    • min. system CPU: 2GHz
    • OS: MacOsX >10.6.8, Windows 2000/XP, Vista, Win7/8
    • Host: Pro Tools > V8

    DOWNLOAD THE DEMO HERE
    WIN | MAC

  • An equalizer is probably the tool you use most while mixing and mastering, so you need the best of the best. With FabFilter Pro-Q 3, you get the highest possible sound quality, a very extensive feature set, and a gorgeous, innovative interface with unrivalled ease of use.

    Mixing and mastering features
    Pro-Q 3 offers everything that a demanding engineer could wish for: top-quality linear phase operation in addition to the zero latency and unique Natural Phase modes, smooth dynamic EQ, per-band mid/side processing, full surround support (up to Dolby Atmos 7.1.2), an intelligent solo feature, optional Auto Gain and a built-in, fully customizable spectrum analyzer.

    Effortlessly sculpt your sound
    FabFilter Pro-Q 3 is designed to help you achieve your sound in the quickest way possible. Via the large interactive EQ display, you can create bands where you need them, enable dynamic EQ for any band, and select and edit multiple bands at once.
    Unique features like Spectrum Grab, Full Screen mode and EQ Match will speed up your workflow even more. Try it yourself!

    FabFilter goodies
    Of course, you also get all the usual FabFilter goodies: perfectly tuned knobs, interactive MIDI Learn, undo/redo and A/B switch, Smart Parameter Interpolation for smooth parameter transitions, an extensive help file with interactive help hints, sample-accurate automation, advanced optimization and much more.

  • A crush on music

    Distortion and saturation play a very important role in music production. From subtle, clean and warm tube or tape saturation to the wildest multiband guitar amp effects: FabFilter Saturn 2 delivers.

    Saturn 2 introduces a host of new features such as a redesigned interface with modulation visualization, new subtle saturation and linear phase processing for mastering, many new distortion styles, and more.


    Warmth, harmonics, color and dynamics

    FabFilter Saturn 2 offers a range of different high quality distortion models, inspired by the vintage sound of tubes, tape, transformers and guitar amps. In addition, you get five creative FX distortion styles to mangle your sounds in weird and unexpected ways.

    With its multiband design and per-band feedback, dynamics, drive, tone and modulation options, Saturn 2 will bring a unique flavor to your music.

    Bring your sounds to life

    Add life and depth to your music using the extensive modulation section. By applying subtle modulation to crossover frequencies, dynamics, band levels or tone controls, great warmth and definition can be achieved.

    With all the XLFOs, EGs, XY controllers/sliders, envelope followers and MIDI sources you will ever need, you get practically unlimited modulation possibilities. Creating new modulation connections could not be easier: just drag and drop. And Saturn 2 visualizes all modulation in real-time to show exactly what’s going on.

    FabFilter goodies

    Finally, FabFilter Saturn 2 contains all the usual FabFilter goodies: perfectly tuned knobs, MIDI Learn, Smart Parameter Interpolation for smooth parameter transitions, interface resizing and full screen mode, support for Avid control surfaces, GPU-powered graphics acceleration, extensive help with interactive help hints, SSE optimization, and much more.


Triggering Sounds

So far, everything we’ve looked at has involved a relatively ‘passive’ use of sound, in that the sounds are in the world and automatically playing. In order to create more compelling game experiences, you may want to trigger sounds to play at specific points within the game.

To do this, we need to use Unreal’s Blueprint system, which allows us to build complex systems that can control any aspect of the game using a graphical environment rather than writing code. Covering Blueprints in any kind of detail is beyond the scope of this article, but we can build a pretty simple system that will trigger a sound to play quite easily – so let’s do that.

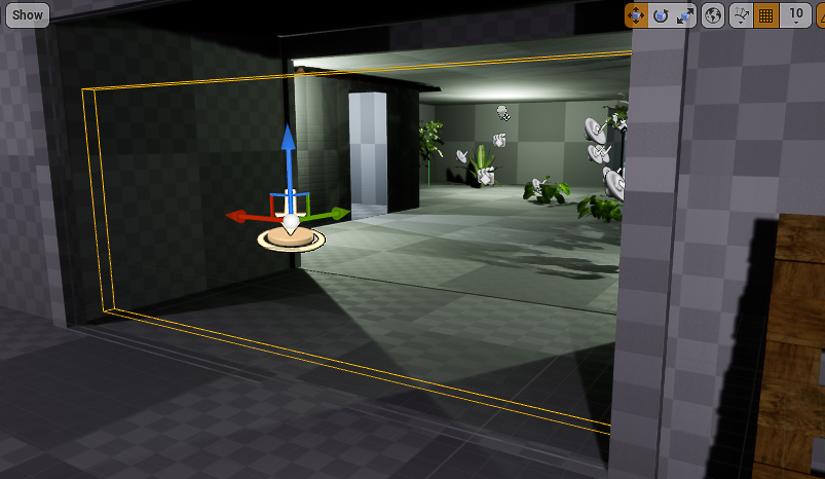
In this scenario we’re going to trigger a ‘stinger’ effect when the player enters a specific section of the game, as a kind of sonic reward. The first step is to create a Box Trigger by dragging it in from the Basic section of the Place Actors tab.

UE-audio-tutorial-30

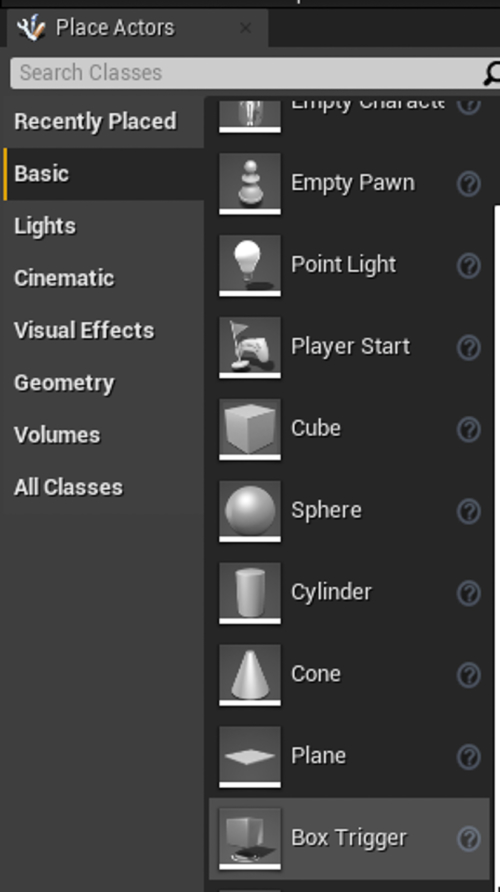
You can then set its location and size as you need.

UE-audio-tutorial-31

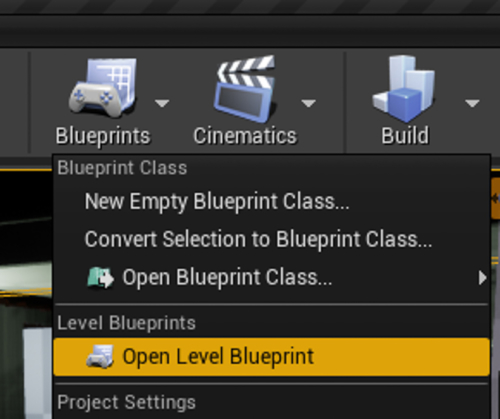
Now, with the trigger actor selected in the level, open the Level Blueprint using the Blueprints button.

UE-audio-tutorial-32

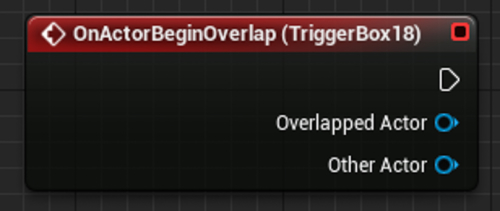
You’ll be presented with an empty space (which can be a little daunting at first), but just like with Sound Cues, there is a degree of context-based suggestion available. Right-click in the blueprint and expand the sections to get to Add On Actor Begin Overlap (once you know what things are called you can just type their names).

UE-audio-tutorial-33

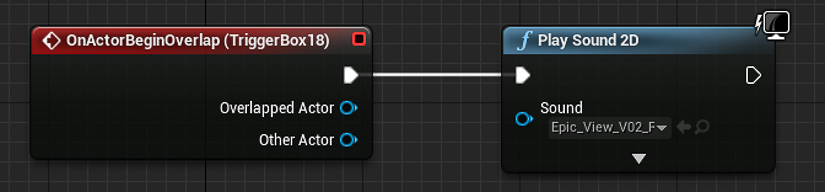
This will create a node that fires off every time something enters the Trigger Box.

UE-audio-tutorial-34

Drag off from the exec pin (the white triangle) and type ‘Play Sound 2D’, and then select that node from the list.

UE-audio-tutorial-35

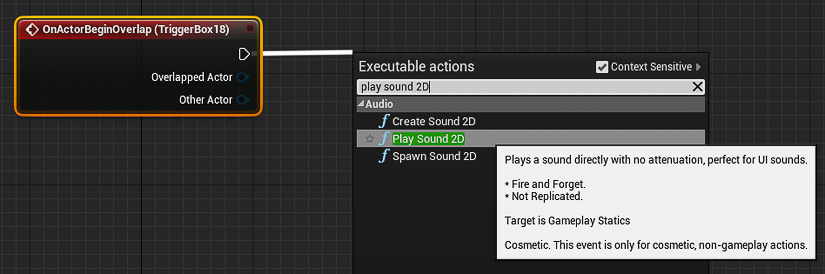
Congratulations! You’ve just created your first Blueprint system. Now you can assign your sound to the Sound property of the Play Sound 2D node.

UE-audio-tutorial-36


Unreal Engine Audio Tutorial: Triggering Sounds


Triggering Sounds

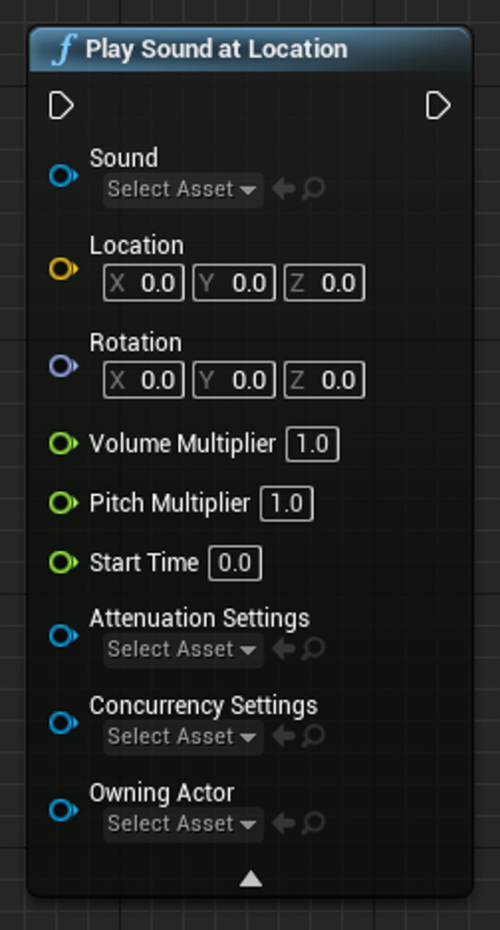
We used a Play Sound 2D node here because we’re playing a ‘non-diegetic’ stinger sound which we don’t want to be spatialized within the world (we want it to just play straight to the speakers/headphones), but if you wanted to play a sound and have it spatialized you could use the Play Sound at Location node.

UE-audio-tutorial-37

Blueprints are very powerful, and it’s certainly worth spending some time learning what you can do with them if you want to build any form of interactivity into your sound systems… Having even just a passing knowledge of Blueprint systems will enable you to create prototype systems and tap into systems produced by other game dev disciplines – all of which will empower you as a game sound designer and make you more valuable within your team.


There is a lot more that you can do with the Unreal audio engine, for example, the attenuation settings allow you to set up occlusion on individual sounds, there are now some pretty complex analysis tools that you can use to drive gameplay elements, sample accurate timing of sounds and music is now possible using the Time Synth system, there are a range of different DSP effects that can be applied to sounds and sub-groups of sounds, you can route incoming audio from a microphone directly into the game-world, to name just a few. But covering these would take us beyond the scope of a ‘primer’, so if you’re interested in taking things beyond the basics in Unreal, then come check out our course (and future courses)…

A big thanks to Dave Raybould for this how-to guide on getting started with audio in Unreal Engine 4!
 

Please share this:


THE WORLD’S EASIEST WAY TO GET INDEPENDENT SOUND EFFECTS:
 
A Sound Effect gives you easy access to an absolutely huge sound effects catalog from a myriad of independent sound creators, all covered by one license agreement - a few highlights:

  • Destruction & Impact Sounds Cataclysm Play Track 1482 sounds included $156

    Cataclysm is a vast collection of recorded, synthesized and designed sounds created to support important destructive moments and add a stronger sense of extreme consequence to any sound.

    The recorded section of library features elements such as flash powder explosions, propane cannon blasts and artillery cannons recorded in unique natural environments with violent transients and lush, long and varied tails. It also features falling trees, forge burners, large trebuchet wood groans, rock smashes as well as more ordinary items recorded and designed to feel like an over the top version of themselves such as vacuum cleaner suctions, metal vase holders, ground pounders and more.

    The synthesized section of the library features equally rich textures in the form of explosion sweeteners, other-worldly environmental reflections, scorching energy risers and more.

    Finally, recorded and synthesized content was employed to develop the designed section, where the hyperrealism of the recordings meets the clean yet aggressive textures of the synthesized section in catastrophic assets themed around the library’s title.

    Bonus: Two extra libraries included for free:
    This library also includes two additional releases from Mattia Cellotto - for free: Crunch Mode delivers 230 crunchy sounds made with a variety of vegetables, fresh bread, pizza crust and a selection of frozen goods. The Borax Experiment gets you 158 squishy, gory, slimy and gooey sounds.
    20 %
    OFF
    Ends 1715637600
  • Western Black Powder Guns is a collection of 19th century firearm sounds, created by sound designer Barney Oram. It features 496 sounds in total, including 440 multichannel source sounds and 56 designed sounds, supplied in 192kHz 24bit WAV file format.

    This library contains a selection of classic Wild West style weapons, including; Colt 1851 Navy Revolver, Pattern-Enfield 1853 Rifle, Snider-Enfield 1861 Artillery Carbine, Winchester Model 1887 Shotgun and more.

    Recorded on a private shooting range in the UK, this library features multi-mic coverage and a range of distance positions captured on all included source content. Microphones used include; Schoeps, Sennheiser, Neumann, AKG and DPA, captured with recorders such as Sound Devices, Zoom, Sony, and more.

    In addition to source recordings, Western Black Powder Guns also contains a generous designed section, lovingly crafted to be of immediate use to sound designers. The designs are an homage to the classic gun sounds of Western movies, mixed with a tight and punchy modern edge.

    This library includes detailed SoundMiner metadata and utilizes the UCS system for ease of integration into your library.

    Behind the Scenes Video:


    Western Black Powder Guns Sound Library - Behind the Scenes


  • Materials & Texture Sound Effects Glacier Ice Play Track 300+ sounds included $32

    Glacier Ice is a library containing over 300 high quality sounds of ice cracking, breaking, shattering in various sizes of blocks – recorded entirely in the Italian Alps over the course of two winters.

    The library contains sounds of all dimensions, from ice cubes being dropped in a drink to a designed iceberg collapsing.

    The majority of the material was recorded at 192 KHz with a Sanken CO100K and a stereo pair of Sennheiser MKH8040, making this library greatly flexible for pitch shifting and all sorts of heavy processing.

    A small section recorded at 96KHz features sounds recorded exclusively with contact microphones placed directly on the surface of a frozen water stream.

    Bonus: Two extra libraries included for free:
    This library also includes two additional releases from Mattia Cellotto - for free: Crunch Mode delivers 230 crunchy sounds made with a variety of vegetables, fresh bread, pizza crust and a selection of frozen goods. The Borax Experiment gets you 158 squishy, gory, slimy and gooey sounds.
    20 %
    OFF
    Ends 1715637600
Explore the full, unique collection here

Latest sound effects libraries:


Leave a Reply

Your email address will not be published. Required fields are marked *

HTML tags are not allowed.