


In big AAA game studios there are often dedicated audio programmers to deal with issues in that field, and fully-flushed out tools like third-party middleware deliver the tools to enable sound designers to implement complex systems without any need for code.
Yet many game audio professionals long for more technical knowledge, and companies seek applicants with scripting experience. And often times indie developers are wary of cryptic errors from middleware software or are not willing to pay the licensing costs.
In these cases it can be helpful to have some understanding of the basics of scripting or to be able to solve some simple problems autonomously. This guide shall be an introduction to this field.
Written by Maris Tammik
Welcome! This article is the first of a multi-part series (part 2 is here), which aims to give you a brief introduction to game audio scripting in Unity. No prior knowledge is required but would be helpful.
Just to get a couple of things out of the way: this is not a complete introduction to the Unity game engine. I will touch upon some of the basics fairly quickly and skip a bunch of stuff as this is a short guide to audio scripting, not a class on game development. I can highly recommend the tutorials available on the Unity Youtube channel as well as this very comprehensive course (which I have taken myself a while back and which goes on sale regularly).
One of the most important parts of software development might be knowing the right keywords to search for
It shall serve as a starting point of inspiration. I believe the most important part is to get going. Some of the topics I’ll just touch upon or mention in passing in the hopes that you take the time to research them yourself. As I feel one of the most important parts of software development might be knowing the right keywords to search for. Almost every problem you will encounter has been solved many times over in places like the Unity forums, StackExchange, YouTube and most importantly the Unity documentation are all brilliant sources of information.
This guide is based on Unity 5.5 onwards, but pretty much all of it is compatible with versions 5+ at which point Unity introduced a whole range of new functionality to the audio system.
The project I am working on is being hosted on GitHub and you are free to use it to study, modify and ship games with. If you don’t know what git is, watch this intro first. This guide will have a part 2 and 3 (and possibly more) to dive deeper into certain aspects of this topic. I do this sort of audio coding for a living but am fairly new to programming myself so take any of my advice with a grain of salt.
[tweet_box]An Introduction to Game Audio Scripting (Part 1)[/tweet_box]
Let’s get started by opening Unity and creating a new project. Unity will automatically create a new scene which will already be open. You should see a hierarchy view, a scene view, inspector view, and a console. If you are missing any of these don’t despair! You can choose which views to open by selecting them in the “Window” menu in the top menu bar.
You can choose which views to open by selecting them in the “Window” menu in the top menu bar
To re-arrange the views you can click and drag the bright grey tabs and sliding them around. Here you can see how I have my Unity layout setup. Note that my project tab has a tiny list instead of giant symbols which is accomplished by that little slider at the bottom of the Project tab.
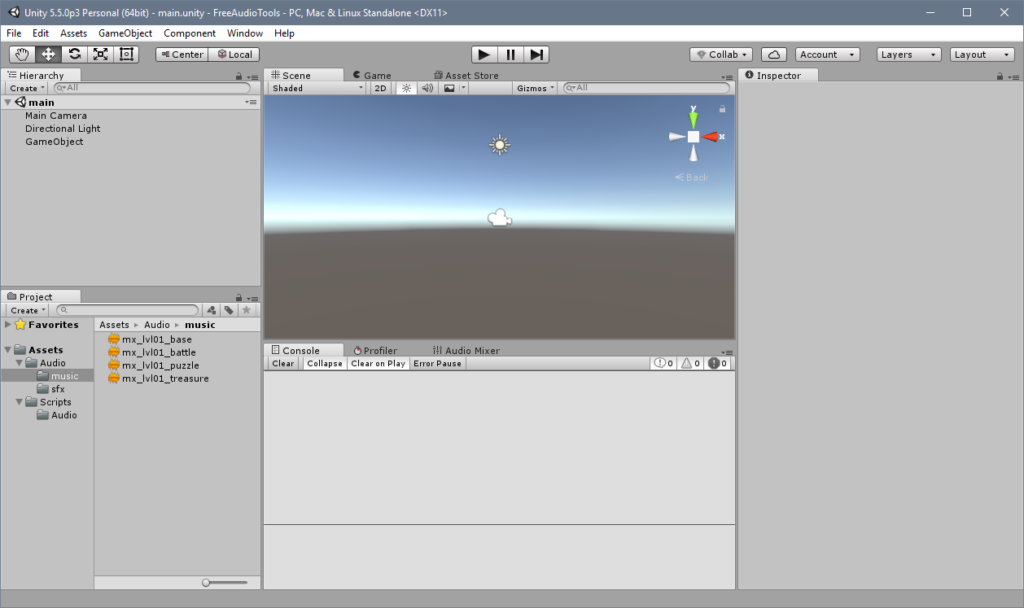
To get audio playing in Unity we first need an AudioSource. This is a component, meaning that it needs to be attached to a GameObject. Let’s start by creating a script we can attach to a GameObject which can access the AudioSource. For that to happen let’s just create a new script called “AudioSourceController” in the Assets/Scripts/Audio folder. Simply right click in the Project view and select “Create/C# Script” or select “Assets/Create/C# Script” from the dropdown menu at the top of the Unity window.
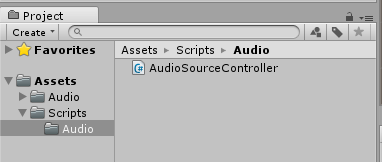
The script automatically contains a class with the same name we gave the script.
[code]using System.Collections;
using UnityEngine;
public class AudioSourceController : MonoBehaviour {
// Use this for initialization
void Start () {
}
// Update is called once per frame
void Update () {
}
}[/code]
Notice that the class inherits from the MonoBehaviour by default, which enables our script to be attached to GameObjects and has a bunch of other neat side effects. For example, it contains a Start() and a Update() method. Start() gets called at the beginning of the scripts life cycle while Update() gets called every single frame of the game.


Awake() should generally be used to initialize the class itself where Start() should be used to initialize connections with other classes and objects
To access an AudioSource attached to the same GameObject as our AudioSourceController we first need a place to store a reference to the AudioSource (which I will name _source). Instead of using the Start() method, I will create an Awake() method (another of the MonoBehaviors perks) which runs before Start(). Awake() should generally be used to initialize the class itself where Start() should be used to initialize connections with other classes and objects.
I’ll assign _source to be an AudioSource attached to the GameObject. If the _source is “null” (meaning it’s empty) then this means there is no AudioSource attached and I will attach one to the GameObject to which the AudioSourceController is attached to.
[code] private AudioSource _source;
void Awake()
{
_source = GetComponent();
if(_source == null)
{
_source = gameObject.AddComponent();
}
}[/code]
Note that a GameObject is a type of object where as gameObject is a reference variable inherited through the MonoBehaviour (these things are real net I’m telling you).
Now that we have a reference to the AudioSource we can access it with our script and do all kinds of magic, let’s make it play a sound!
To get that going we first need a sound to play. In Unity this would be of the type AudioClip. We want to be able to assign an AudioClip from outside the script so we’ll declare a variable called Clip of type AudioClip as public. I have chosen to use an uppercase “C” to remind myself that the variable is public. Since we didn’t specify the access when declaring the _source variable it defaults to private, so we name it lowercase and with an underscore in front of it. . Let’s also specifically state that:
[code] private AudioSource _source;
public AudioClip Clip;[/code]
Next we can assign the Clip to our _source and call the Play() method. Let’s do that in the Start() method as it has to do with the _source object which is external to our controller class.
[code] void Start () {
if(Clip != null)
_source.clip = clip;
Play();
}[/code]
If we switch back to Unity it will compile our script (this will be represented with a little spinning wheel in the very bottom right) and after that is complete we can create a GameObject in the scene and attach our AudioSourceController to it. We will do so by right-clicking in the hierarchy tab and selecting “Create Empty”. Alternatively we can go to the top menu and select “GameObject/Create Empty” or using the keyboard shortcut Ctrl+Shift+N.
![]()
The new GameObject should be automatically selected and show up in the Inspector tab of Unity. Right now it’s empty so let’s click the “Add Component” button and type in “AudioSource”. The list of available classes will be filtered and you should see both the AudioSourceController script and the AudioSource component show up. Let’s select the controller script.
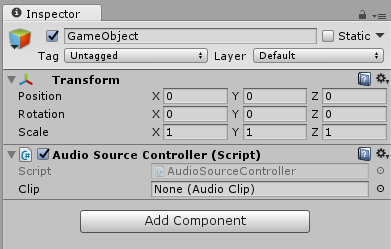
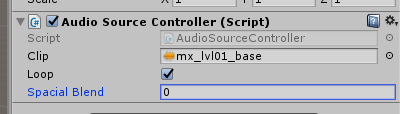
Our public variable Clip is automatically displayed so we can either drop an AudioClip in there or click the little target to the right of the field to get a list of all available AudioClips.
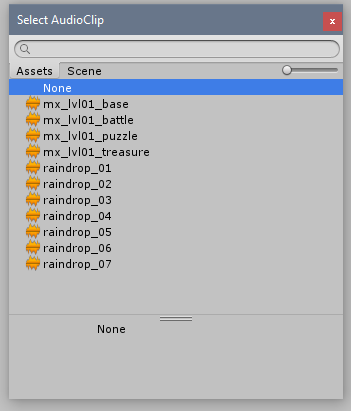
As you can see I already have a couple of AudioClips in my Unity project located at “Assets/Audio”. I have decided to create two sub folders called “sfx” and “music” for the sake of sanity. If you have a looping music or ambience file I would suggest choosing that for now. If you are choosing your file in the Object picker there is a little bar at the bottom (saying “None” in the screenshot) gives you some information about the selected file. Clicking on the waveform to the left will play a preview of that file.
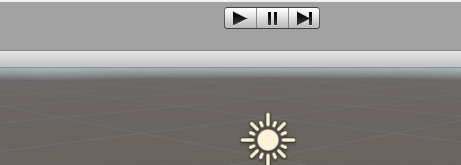
Once we have an AudioClip assigned to our Clip variable we can hit the play button on the top of the Unity Editor.
As soon as the scene starts playing we should hear the audio clip playing but at the end of the clip the audio stops. What we need to do is to enable looping so that the sound continues playing when reaching the end. Let’s get back into scripting!
I’ll remove the comments that Unity put into the script in front of the Start() and Update() methods as well as the Update() method itself. We don’t need it for now.
At the bottom of our script I’ll create a public SetSourceProperties() method that does not return any information (indicated by the return type void). We will look at methods with different return types in the next chapter.
The curved brackets after the method name define the parameters passed to the method
The curved brackets after the method name define the parameters passed to the method. We can put various variables the method should have as an input but for now we’ll start with an AudioClip, a boolean (meaning either true or false) for looping and a floating point variable called SpacialBlend. The latter will determine whether the sound should be placed in 3D space or coming straight out the speakers. When this is set to “0” it will play out the speakers (in stereo or out the center if the sound is mono) and when we set it to “1” the sound should come from the direction the GameObject is located at. The variables for the method are lower case since they are not public for the entire class and don’t have an underscore since it is method specific.
I’ll also add public variables for the looping option and the SpacialBlend parameter at the top of the script right next to the Clip variable. The variables will have default values so if we create a new AudioSourceController for a different sound it will automatically have those values. Now we can use these variables to set properties of the _source, and instead of setting the _source.clip property we can just call the SetProperties function. I’ll also create a Play() method which will call the SetProperties() method and then call Play() on the _source. Which only leaves me to call the AudioSourceController’s Play method in the Start function. Now save your work and back to testing!
[code]public class AudioSourceController : MonoBehaviour {
private AudioSource _source;
public AudioClip Clip;
public bool Loop = false;
public float SpacialBlend = 1f;
void Awake()
{
_source = GetComponent();
if(_source == null)
{
_source = gameObject.AddComponent();
}
}
void Start () {
Play();
}
public void SetSourceProperties(AudioClip clip, float volume, float picth, bool loop, float spacialBlend)
{
_source.clip = clip;
_source.loop = loop;
_source.spatialBlend = spacialBlend;
}
public void Play()
{
SetSourceProperties(Clip, Loop, SpacialBlend);
_source.Play();
}
}[/code]
After switching back to Unity (and waiting for it to recompile) our scripting inspector now should have two new properties exposed. Let’s tick that Loop checkbox and set the SpacialBlend to “0”.
Now the sound loops properly and if it’s stereo the left channel will come out to the left and vice versa with the right channel. The properties only get applied when the game is not running so we can not control the audio in real time, but for now this is good enough. Back to scripting!
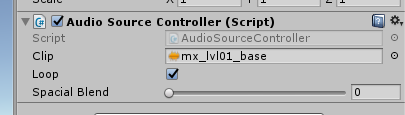
One issue that currently exists is that the SpacialBlend parameter can be set to values lower than “0” or higher than “1” but the AudioSource only wants to receive values between “0” to “1” in that specific field. Let’s add the Range parameter to that field.
[code] public AudioClip Clip;
public bool Loop = false;
[Range(0f, 1f)]
public float SpacialBlend = 1f;[/code]
Once you save and Unity recompiles the script it will replace the numberbox with a slider which will prevent invalid values.
Now that we have a GameObject that automatically ensures an AudioSource, holds reference to an AudioClip and has some basic playback properties it would be a good idea to save it as a prefab. Prefabs are Unity’s way to store a GameObject’s state in a form of preset. Prefabs can be instantiated via Script or placed in a scene by hand. And now the magic part: if you edit a prefab in the Project (or in the hierarchy and then hit the “Apply” button) it changes the properties of every instance of that prefab! Which means that if we decide we want a different sound effect to happen when the evil dude gets punched by the badass princess the punch sound changes in every scene! Thanks Unity. :D
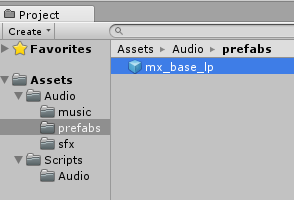
To save the GameObject as a prefab we simply drag it into a folder of the Project tab. Let’s create a “Prefabs” folder in the “Audio” folder to store our audio prefabs in.
Naming conventions are important and being consistent about them doubly so
Mine is using a looping music file so I’ll call mine “mx_base_lp”. I personally use suffixes to categorize sound assets. Ambient long looping files use “amb”, sound effect use “sfx” and music files use “mx”. Often times files that are supposed to loop have the prefix “lp”. Naming conventions (whichever you stick to) are important and being consistent about them doubly so.
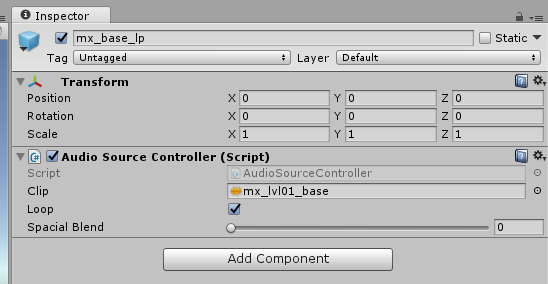
Once the GameObject is saved as a prefab the logo in the inspector turns from the colorful cube into a blue cube signalling that indeed it is a prefab. If you select the GameObject in the hierarchy view now its name is written in a blue font instead of the normal black one and on top of that the Inspector shows a couple new controls.

Select will reveal the prefab the game object is linked with, if you edit the properties the Revert button will reset them to the values found in the prefab and the Apply button will override the prefab values with the new settings. This enables you to have a sound in the scene, play the scene, tweak the values a bit and then decide if you want to use the new values or if the old settings were better.
Now back to scripting. I added the variables Volume and Pitch and added them to the SetSourceProperties method but since that method is being called with different parameters down in the Play method it is being underlined.
[code] public void SetSourceProperties(AudioClip clip, float volume, float picth, bool loop, float spacialBlend)
{
_source.clip = clip;
_source.volume = volume;
_source.pitch = picth;
_source.loop = loop;
_source.spatialBlend = spacialBlend;
}
public void Play()
{
SetSourceProperties(Clip, Loop, SpacialBlend);
_source.Play();
}[/code]
The error list of Visual Studio is showing the error like this:
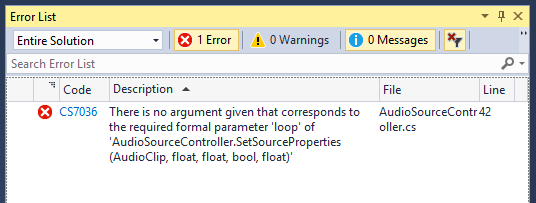
What this means is that the function is expecting parameters of certain types in a specific order, but is receiving unexpected parameters. We’ll have to go and update it like this:
[code] public void Play()
{
SetSourceProperties(Clip, Volume, Pitch, Loop, SpacialBlend);
_source.Play();
}[/code]
Right now we are processing Volume and pitch in a rather weird format for sound designers. We audio folk are used to our decibels and semitones. We will address that issue in the next article as well as adding some randomisation to parameters and more fun stuff. We’ll learn how to instantiate a prefab we created and how to control it from another script so that the game code can interact with the sound.
Later we’ll look at more convenient ways of storing our audio behaviours in a format called ScriptableObject, create more custom user interfaces for easier audio implementation, start controlling sound in real time and much more!
In the meantime I highly encourage looking at other variables the AudioSource has to offer. Read up on the parameters it has exposed in the Unity scripting documentation and add your own functionality to the script.
Thanks for coming along on this journey. I hope you enjoyed this intro to Unity audio scripting! Hope to have you around when we dive a little deeper ;)
[code]
using System.Collections;
using System.Collections.Generic;
using UnityEngine;
public class AudioSourceController : MonoBehaviour {
private AudioSource _source;
public AudioClip Clip;
[Range(0,1)]
public float Volume = 1f;
[Range(.25f, 3)]
public float Pitch = 1f;
public bool Loop = false;
[Range(0f, 1f)]
public float SpacialBlend = 1f;
void Awake()
{
_source = GetComponent();
if(_source == null)
{
_source = gameObject.AddComponent();
}
}
void Start () {
Play();
}
public void SetSourceProperties(AudioClip clip, float volume, float picth, bool loop, float spacialBlend)
{
_source.clip = clip;
_source.volume = volume;
_source.pitch = picth;
_source.loop = loop;
_source.spatialBlend = spacialBlend;
}
public void Play()
{
SetSourceProperties(Clip, Volume, Pitch, Loop, SpacialBlend);
_source.Play();
}
}
[/code]
Maris Tammik is an audio programmer at A Shell In The Pit Audio, where they build implementation tools for sound designers. Their passion lies with that magical moment where sound meets code. You can follow Maris on twitter @fuzzblob.