


1. Direct Offline Processing • 2. Workflow Gimmicks • 3. Sample Editor • 4. Export Options • 5. Key Commands / Macros / Project Logical Editor • 6. Automation • 7. (Cycle-) Markers- / ADR-Panel • 8. Media Bay and Pool / Library • 9. Sampler Track • 10. Game Audio Connect • 11. Ambisonics • 12. Multi-Panner and IOSONO Anymix Pro • 13. ReConform • 14. Network Editing • 15. External Synth and FX • 16. Control Room
1. Direct Offline Processing
One of the most powerful features for designing sounds, editing and even mixing in Nuendo is the “Direct Offline Processing” (DOP) which was introduced in Nuendo 8. This function allows you to directly render any VST(3)-plugins and processes like Normalization or time stretching directly in any audio event. At first glance this doesn’t sound dramatically unique since many DAWs allow you to offline render effects in selected audio events.
In Nuendo (and meanwhile also in Cubase) this goes several steps further…s
a) By checking “Auto-Apply” any parameter change is instantly rendered into the audio event. This and the fact that each audio-event has it’s own list of DOP-Processes lets you create variations of the same sound in no time. Of course it is possible to do these adjustment for several clips at once if they have the same plugin in the list. If there were process applied after the adjusted plugin then these get re-applied automatically.
This gives a realtime feel while leaving your CPU alone.
b) It’s fully reversible at any time and is stored within a project for every audio event individually. This means any plugin in the processing chain can be adjusted, bypassed or removed at any time while keeping all other plugin in the chain active. It is also possible to change the processing order even after closing and re-opening the session.
You can copy & paste processing chains between audio events.
c) You can assign keyboard shortcuts to any offline-process or VST-Plugin. This allows an extremely fast workflow for frequently used tools.
Some examples:
To apply the built in Pitch Shifter (with Pitch curves) I simply press Shift+Cmd+P and the selected audio event instantly gets pitched according to the current settings pitch settings. With the key command Shift+Cmd+T Time stretching is applied (with the built in zPlane Elastique 3 algorithms if you like). I can then play with the settings which are instantly applied to the audio.
I also crested key commands for my favorite EQ plugin, surround channel reordering, and RX Connect.
d) If you want the audio to be processed beyond the borders of the clip/event you can set a handle size to extend the processing range. You can also set a tail size for rendering effects like Reverbs and Delays.
e) Processes can be applied to a single event, all selected events or just to a selection inside of an audio event. But subsequent adjustments can be made independently.
f) Plugin- and processing-chains can be stored as favorites. Or you can load a previously stored Track-FX-Chain. This makes batch processing inside of Nuendo a snap.
[tweet_box]Make the most of NUENDO as a sound design tool[/tweet_box]
g) Randomizer Plugin with DOP
This plugin in combination with the Direct Offline Processing is extremely powerful and fast when you have to create variations of the same sound e.g. for game audio. It applies random (in a definable range) values for pitch, timing, impact (transients) and color (filtering) to each of the selected sounds. So just copy one sound and apply the Randomizer via DOP → done.
h) Working with RX-Connect and DOP
Izotope’s RX (Advanced) is a crucial tool for any sound-editor /-designer. With the RX Connect plugin you can easily send audio from the DAW to RX and back. Of course this is also possible in Nuendo through Direct Offline Processing with single event or multiple audio-events. Since I need this quite often I assigned a keyboard shortcut to it as well. So I just need to select any audio-event(s) hit Alt+Cmd+C and they all appear in RX. I then do the appropriate editing there hit Alt+Cmd+C in RX and the edited audio goes back to RX Connect plugin in Nuendo.
There is only one drawback: Auto-Apply doesn’t work (yet) for the sent back audio from RX. So “Auto-Apply” has to be unchecked and the edited audio from RX has to be applied manually. Izotope is already working on this…
i) Feature Wish:
Offline Automation / Envelopes:
A waveform view (like the Sample Editor) docked to the bottom of the DOP window showing the selected Event / Range (If several Events are selected with tabs/list).
Then simply click and create curves of any parameter of the currently loaded plugin/process. Any changes (after mouse button release) will applied automatically to the event.
Want to know more about Nuendo? Explore Steinberg’s pages dedicated to Nuendo here – and get a free 60 day trial here.
2. Workflow Gimmicks
a) Alignment
Nuendo has a built in feature to align audio. This can be done with only 2 clicks and delivers results similar to Synchroarts’ VocAlign Project 3. Very helpful for ADR or vocal double tracking. This feature was just improved in Cubase 10 which will of course find its way into the next Nuendo update.
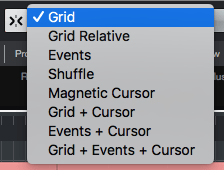
b) Snap to…
Besides the standard snapping modes like Grid, Relative Grid and Shuffle you have two more (and some combined) modes. ‘Events’ and ‘Magnetic Cursor. Both are quite self-explanatory. The ‘Magnetic Cursor’ mode lets your audio, midi or automation events snap to the playback cursor while the ‘Events’ mode snaps your selected events to any other event even on other tracks. This helps a lot to align midi, audio and automation events with ease. But it gets even better…
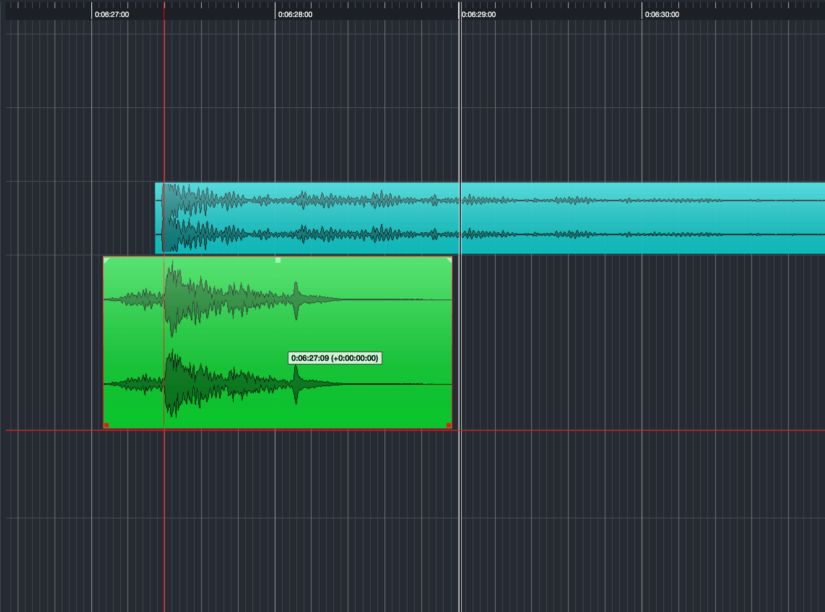
• …Snap Point
As in Pro Tools you can set a Snap Point (Sync Point in Pro Tools) within an audio event. This allows you to let the audio snap with its Snap point position to whatever snapping mode you chose you chose. This is perfect for all sounds that have their climax not at the very beginning of the event (e.g. Whooshes).
• …Cross Hair
If you have the cross hair lines activated in the preferences you get a vertical and horizontal line whenever you drag any kind of event. This makes it a piece of cake to align anything. Especially because this cross hair follows the snap point. So if you drag an audio event with its snap point set somewhere in the middle you see that vertical line originating from there throughout all tracks.
• …Video Follows Edit
When dragging an event, the video scrubs according to the event start or – if the Snap Point was moved within that event according to the Snap Point position. This makes it super easy to perfectly match a sound to picture in no time.
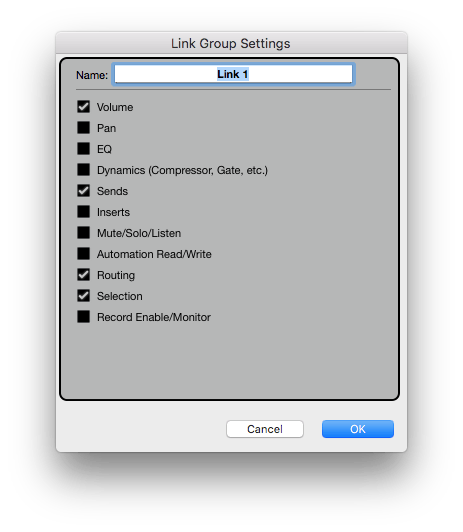
c) Simultaneous parameter adjustments
You can permanently (Link) or temporarily (Q-Link (Alt+Shift)) connect all or selected parameters in the Mixer. This even works for FX plugin parameters (as long as they’re on same slot number. This makes it easy to proportionally adjust e.g. Solo/Mute, Volume or the Highpass-Frequency of an EQ plugin for all selected/assigned tracks at once. In Absolute Mode the appropriate parameters of all tracks in the selection jump to the value of the parameter you’re altering.
d) Slip Content in Audio Event
When working with small events from bigger audio files (e.g. ambiences, drones, or sound effects with variations) I love to have the option to place the event start and end exactly where they need to be and then smoothly scroll the content of the file while maintaining the event borders (Alt+Shift+Drag).
e) Find Silence
I really appreciate the look and feel of the Detect Silence window with detailed graphical feedback and great adjustment options.

f) Channel handling and Split/Merge Tracks
• I really like that Nuendo doesn’t care if the channel count of an audio file does not fit channel count of an audio track. So if you place a mono audio file on a stereo track it automatically sends to left and right. If you place a stereo file on a mono track it folds down to mono. To prevent phasing you can simply apply use the Flip Stereo process to copy the left to right channel or vice versa. Same with surround files and tracks.
• Thanks to VST3 you can easily copy/move any plugin from e.g. a stereo or surround track to a mono track and vice versa. The plugin adapts automatically.
• When having a surround track routed to stereo track the panner automatically gets replaced by a down-mixing plugin tool (MixConvert)
• For any track channel count above LRC you can select.
• When importing an OMF or AAF where multichannel tracks were split to mono Nuendo lets you merge all these split tracks back to their original channel count at once with just one click (Project → Convert Tracks).
• Routing
• Direct Routing lets you send one track to multiple targets with automatic summing and down-mixing. Target selection can also be done dynamically via automation.
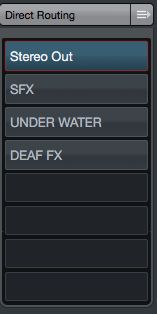
• It’s also possible to send audio only to a specific channel of the target track (e.g. only the center channel of surround bus.
• The only drawback is that you cannot change the channel count of an audio track or Bus after it was created.
g) Re-Record and independent Punch-Point locators
When recording sound effects, Foley or recording in general Nuendo has 2 great features to speed things up.
Whenever there’s a failed take this would mean to select and delete the false take, jump back and restart the recording. With Re-Record this just one click. Especially combined with Pre-Roll and Punch-In recording.
Sometimes it is good or necessary to loop-record. Normally Pre-Roll is played back only before the first cycle. In Nuendo you can set independent locators for recording range and loop range. So you can set the loop locators to play e.g. 2 seconds as Pre- and Postroll before and after the range that you want to record while automatically start and stop the recording in the record range for each cycle, writing separate takes on the lanes (like playlists).
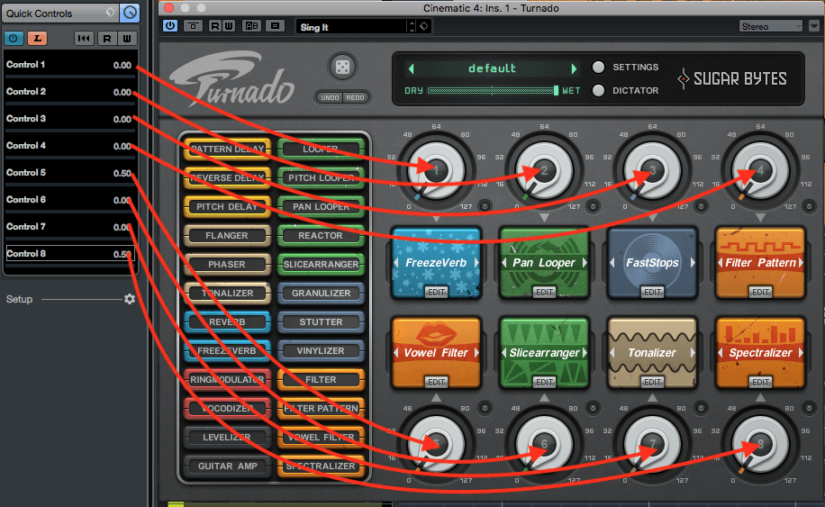
h) Quick Controls
Quick Controls let you easily map 8 parameters to any hardware midi controller. These can then easily be learned to any parameter of a track including any VST effects and sends. These mappings are stored for each track individually.
Nuendo distinguishes between Track Quick Controls and VST Quick Controls (for VST Instruments).
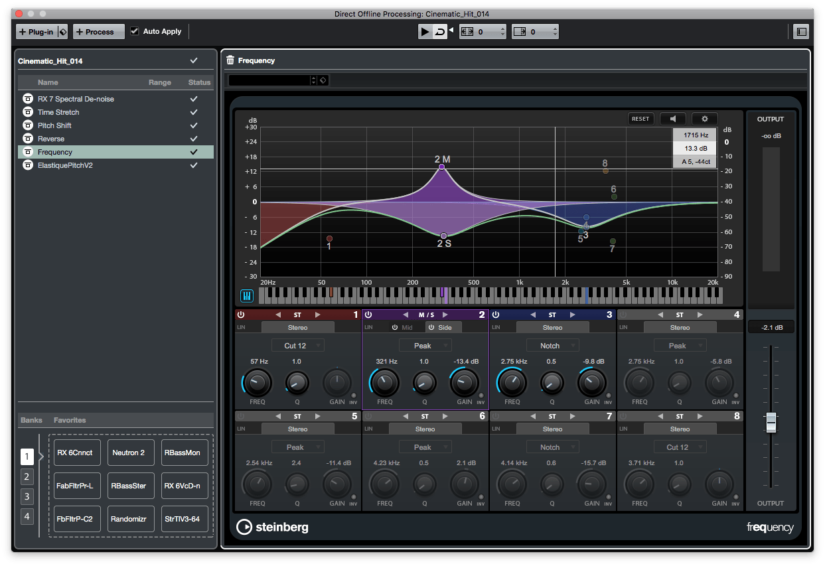
i) Channel Settings / Channel EQ/Filter
What I like about the channel settings is that you have all information regarding the selected channel at a glance. Inserts, Rack Effect, Sends, Send Pan target Busses.
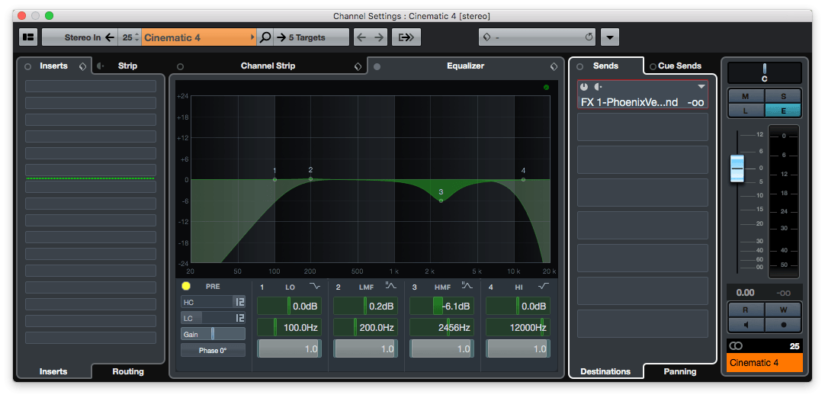
When playing around layering and arranging various sounds while the sound the design process it’s very helpful that any audio-, instrument-, group- or master-channel has its own built in EQ (including separate high- and lowpass filters and invert phase) that can be easily accessed from the Mixer, the Inspector or Channel-Settings Panel.

You can determine its position in signal flow (pre/post inserts) in the channel settings.
j) Plugin Handling
When working in the box there’s is often a huge amount of effects-plugins (and instruments) used to clean, mangle or spice up the sounds. And especially in the design process it is crucial to have the desired plugin at hand in no time. Over time the plugin collection can get quite confusing.
I already praised the Direct Offline Processing above. But also working with realtime effects is a bliss in Nuendo. Besides the sorting options like “category” or “vendor” and the ability to deactivate unused plugins in the plugin manager there are more features that decreases distraction and increases clarity and speed.

• Text Plugin Search
To find and apply the wanted plugin in no-time is a piece of cake in Nuendo. Simply click on the insert-slot where you want to load the plugin to, start typing and press Enter as soon as the desired plugin is highlighted. You don’t even have to enter the full plugin name. To load the NI Guitar Rig 5 for example I simply enter “Rig” and press enter. Of course you can also search for categories like “Dynamics” or Manufacturers like “Steinberg” or “Soundtoys”.
• Plugin Collections
For more clarity it is possible to create several plugin collections. For example a “Favorites”- and a “All EQs” collections. It’s also possible to create subfolders inside collections.
• Move/Copy&Paste
As in most DAWs it is possible to move and copy&paste plugins between channels. Thereby Nuendo adapts the channel count of the source and target tracks so you don’t have to care about. No matter if you copy/move a plugin from a mono- to a stereo track or a surround to mono track.
It is also possible to copy/move all inserts from one track to another. Simply drag the insert header to another tracker without any modifier key.
k) Clarity
• Folder Tracks
Organize all your tracks in folders for perfect overview. Folder-states also apply to the visibility menu. Folder Tacks automatically generate clips when folded according to the events on the tracks inside a folder.
• Find Tracks
Search and select for tracks/channels by name
• Sync Project and Mix Console
This synchronizes the track and channel visibility of the project window and the Mix Console(s)
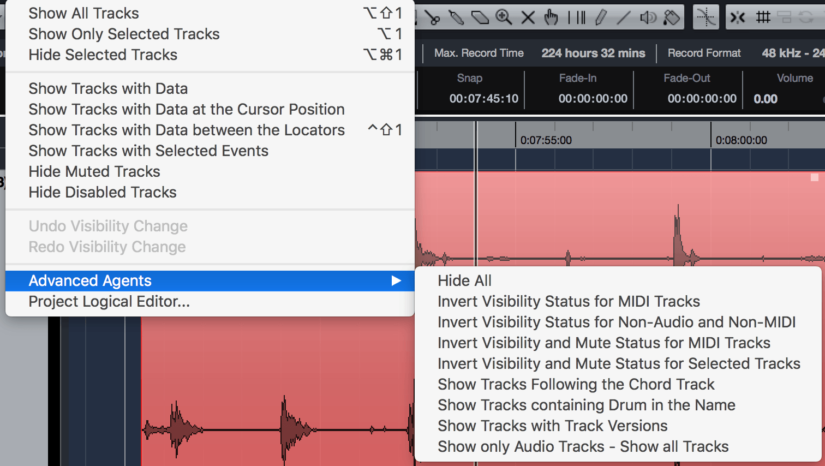
• Visibility Agents
This doesn’t sound very interesting at first but this helps to get a lot of clarity in large sessions. Just a few examples:
• Show channels/tracks for tracks with data
• Show channels for tracks with data at cursor position / between locators
• Show channels/tracks that are connected to the first selected channel (e.g. Effect Tracks, Groups, VCAs, Master)
• Show channel/tracks with selected events
• Hide muted channels/tracks


l) MEM/ZAP
These two are extremely helpful to jump between certain parts in huge sessions. For example, if you are working on a sound effect and need to jump back to another section to copy or listen to an already used sound and then return exactly to the section you were working on, “MEM” temporarily saves the current project window state, including position, horizontal and vertical zoom, cursor position. When you’ve found and copied/extracted what you were looking for somewhere else in the session you can then recall what was save with “ZAP” you can then recall “MEM”. This saves a lot of time navigating through the session.
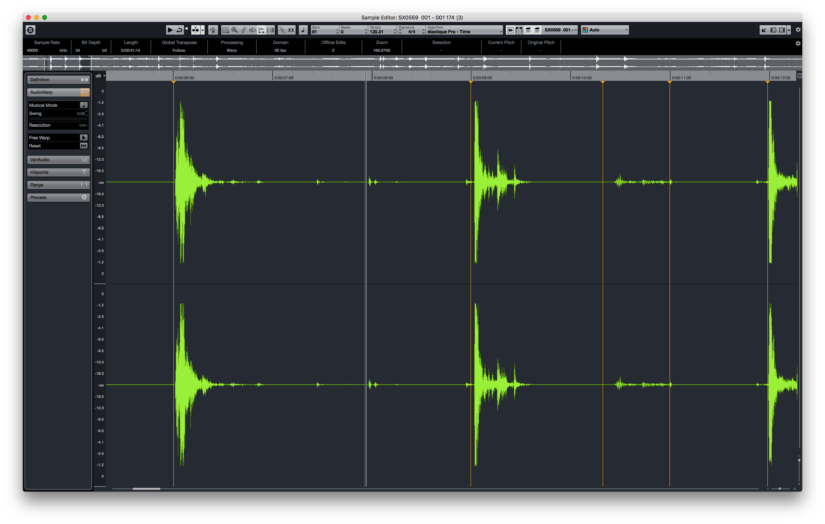
3. Sample Editor
The Sample Editor is a very powerful tool for in-depth audio editing a single audio event or multiple events (with color coding). Besides a very detailed waveform view in full screen in an extra window, layers, independent playback it features:
a) Audio Warp
For automatic or manual quantizing or aligning audio audio events. Simply select two (or clips), open the sample editor and chose to show all selected audio events while editing only one (or all).
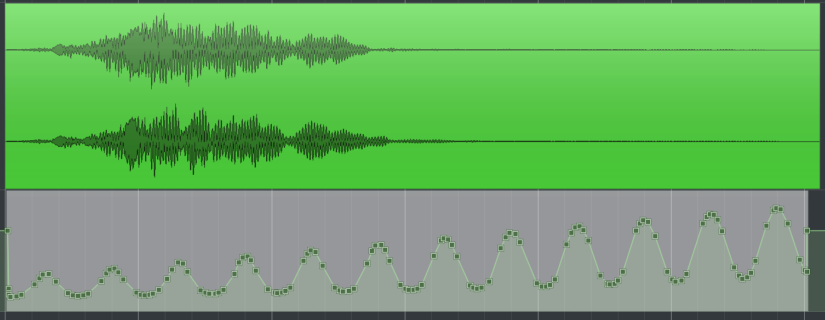
b) Hit Points
To automatically create trigger points at transient points based on a threshold. Each trigger can instantly be monitored. Single Hit points can also be added/removed manually. There’s also an option to automatically create Hit Points for any audio that brought into the session.
Once generated you can: extract the groove, create events or slices (events re-packed in an audio-part container), markers on a marker track, regions (virtual events inside an audio event), warp markers or generate midi-notes/-triggers on new midi-track (including velocities if you like).
c) Vari-Audío
Is a built in pitch detection/correction like Melodyne. I appreciate that it automatically detects atonal parts to only pitch tonal parts. You can manually adjust the pitch drift and you can set notes via a Midi input. It’s also possible to extract the midi to a new Midi-track including Pitch Bend and Velocities. It’s also great for futuristic sound design like robot voices.
d) Processes
Easily apply any process like normalization or any VST plugin with DOP to only a selection of the audio event, a region or the whole event.
4. Export Options
a) Audio Export Window
The Audio Export Window offers many ways to export your mixes, stems, cycle marker regions or single tracks.
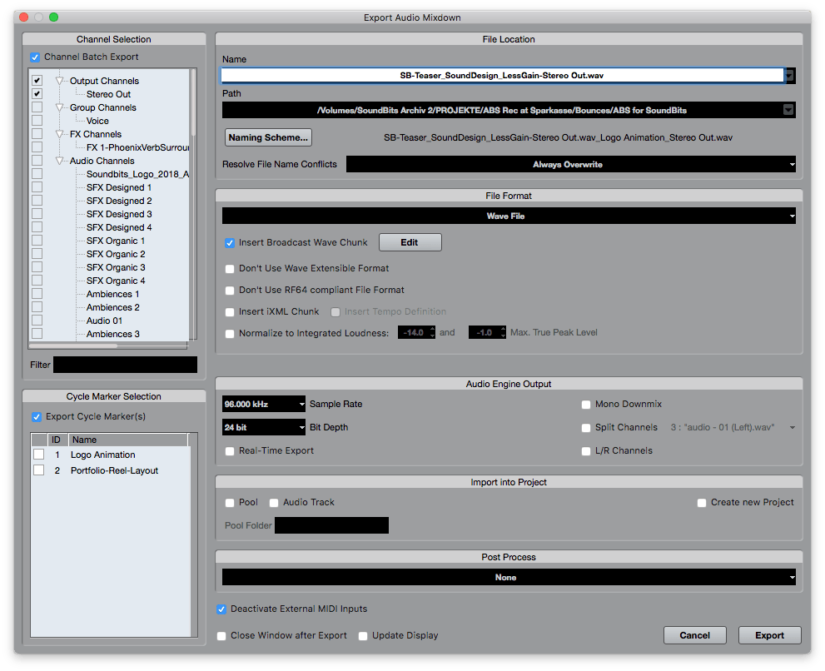
• Channel Batch Export
This lets you export all or a selection of channels at once. Great for exporting the main mix, stems/busses and selected tracks at once. In combination with the Naming Scheme it’s a piece of cake to clearly name the generated audio files.
• Cycle Markers
Especially when creating a large amount of sound effect assets for game audio, film or whatever this feature saves incredibly much time. You can set cycle markers to each sound effect, name it and then export them all in one go. This can be combined with the Scheme and Channel Batch Export. So you get all sound effects mixed, separate busses and single tracks/layers in one run. File names can then for example consist of “Name” (e.g Category like SFX), Cycle Marker Name (e.g. Whoosh), [Cycle Marker ID], [Channel Number)]and Channel Name
Example: SFX_Whoosh-01_Layer-A.wav.
My highest count of cycle marker exports in one go was about 500.

b) Audio Render in Place / Export Selection
These two options let you render the selected events to a new track or quickly export them to a folder without defining a range. Especially the Render in Place function comes in very handy when creating sound effects (-sub mixes) and for quickly rendering virtual instruments and reverb tails etc. This also works with external hardware effects and instruments (Nuendo then does a realtime bounce).
The newly created events are placed perfectly aligned on new tracks under the source tracks.
The special parts about this feature are the option you get how the selected clips should be rendered (separate-/ block-/ as one event(s)) and where in the signal flow the source is for the rendering.
• Dry
Without any channel settings like Volume, Pan, Inserts…
All Channel settings are copied to the newly created track. This is great for rendering edits for each layer but keep realtime FX.
• Channel Settings
With all channel settings like Volume, Pan, Inserts…
• Complete Signal Path
When the source tracks are routed to a Bus, then this is the rendering source. When “Mix Down to one Audio File” is checked also FX-Returns that are linked to the source tracks are rendered.
• Complete Signal Path + Master FX
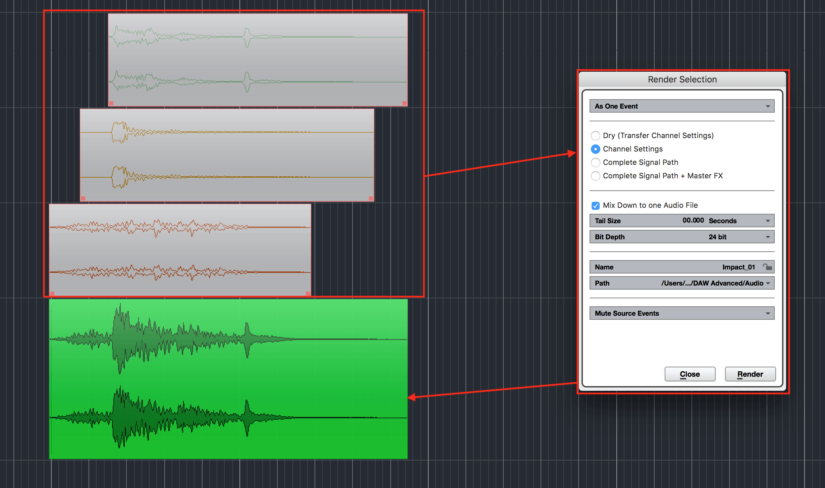
This uses the Main Mix / Master Fader output as pickup source.
Additionally you can set a tail size for FX like Reverbs and Delays, select the Bit Depth, set a name (can be locked to create the filename from source-track and source-event-names, choose a destination path (usually the projects audio folder) and finally if you want the source events to get automatically muted after rendering. Especially when working with virtual instruments.
c) Cycle Marker to CSV
I love this one. This let’s you export all markers from one or all Marker Tracks to one .csv file including a selection of additional data-columns (e.g. dialogue) and TC INs / OUTs. This is great for sending TC sensitive information to other crew members or you can assign someone else to fill in new markers, recording information, editing suggestions, etc.
Even creating new marker tracks is possible via the .csv. The edited .csv file can then be re-imported as new markers in Nuendo (and Cubase).
Also exported markers from other DAWs or NLEs like Adobe Premiere, which also come as a .csv file, can be imported and are placed at their origin TC.

d) OMF/AAF
Of course this can be considered as a standard feature for Post Production Workstation. But especially regarding AAF Nuendo seems to be the only DAW that uses the full capability of AAF. When exporting and importing an AAF multichannel files/track are maintained. Which could save you a lot of time and stress.
e) Clip Package
When two or more sound designers work together on the same project or if you want to keep a layered sound effect for later the Clip Package is a great way to save and exchange a micro layout/arrangement of sound effects and import it in another session, including automation data.
5. Key Commands / Macros / Project Logical Editor
I like it if an application is profoundly customizable to my personal needs. The combination of Project Logical Editor, Key Commands and Macros is right to my taste.
a) Key Commands
In Nuendo (and Cubase) you can simply assign any function with your personal Key Command. Even any installed VST or VST3 plugin can get its own shortcut to instantly apply/customize through the Direct Offline Processing.
Examples:
• To send an audio event to RX via RX Connect I simply press Ctrl+Alt+Command+C
• To offline pitch-Shift an event I press Shift+Cmd+P
• For Time-Stretching it’s Shift+Cmd+T
• To edit the event with a EQ it’s Shift+Cmd+E for Nuendo’s Frequency EQ or Alt+Shift+E for Fabfilter Pro-Q3
• To change the channel order it’s Alt+Cmd+T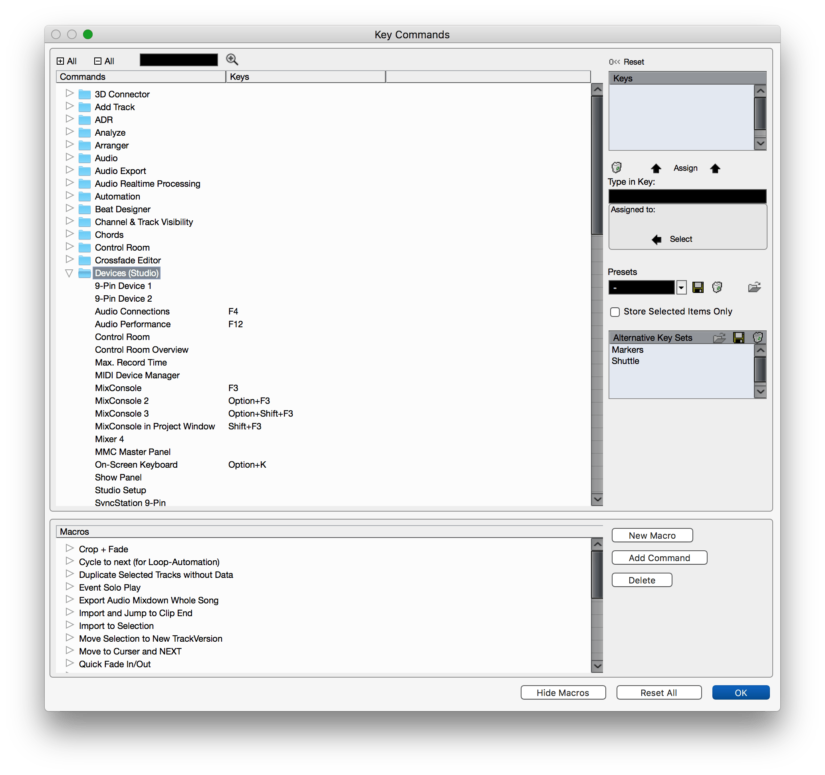
• …
Of course I might be totally stranded when working on someone else’s Nuendo workstation without all my customizations. So I always have a copy of my Key Commands and Preferences with me on a flash drive and on my Dropbox. So I can easily import it in any other Nuendo or Cubase system.
b) Macros
While creating and editing Macros in Nuendo still is a bit bulky it’s absolutely worth the struggle. It lets you combine any chain of key commands to one command that can be triggered by a key command.
Here are 3 of my frequently used macros:
• (Reverse Event and) set Snap/Sync point to End end: Great for sounds that have their climax at the end like risers etc.
• Set range to selection and create an appropriate cycle marker (then jump to next event: Saves a lot of time when preparing a row of designed and layered sound effects for audio export
• Event Solo Play: This plays any event or selection of events in solo mode including full signal flow and fx
• Fit only the selected part of a sound effect from the media bay exactly in the range selection of the selected audio track
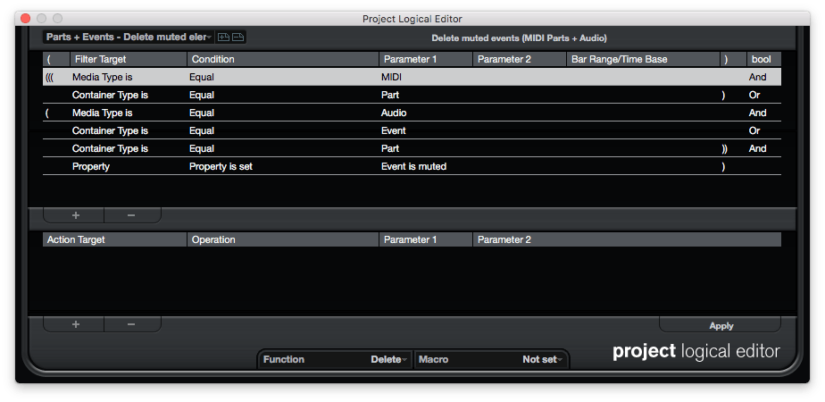
c) Project Logical Editor
• The project logical editor let’s you program and apply logical functions and conditions to ease and speed up your workflow. Some examples:
• Delete all muted events in the whole project
• Select and Rename all Audio Tracks
• Select all Midi-Notes that are off grid
• Select all audio events with ‘whoosh’ in its name
6. Automation
Especially when designing sound effects or mixing film sound it is crucial to have an intuitive, clear and versatile automation system. Recording and editing automation data is one of the very powerful features of Nuendo.
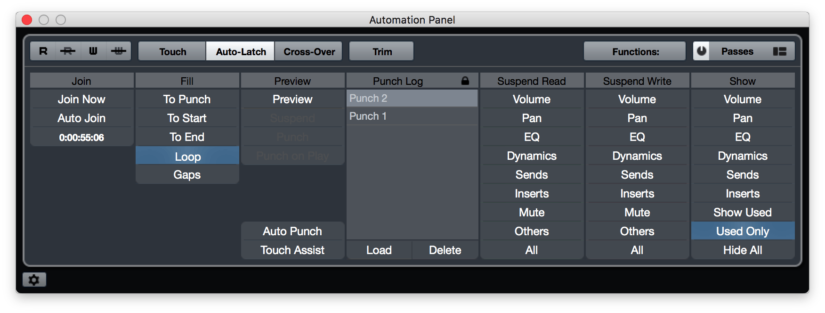
Some options from the Automation Panel:
• Reveal Parameter on Write
This one is hidden in the Automation Panel Settings. If checked, new automation lanes are created automatically whenever you touch any parameter on Write-enabled Track. So you never have to search through lists to find the parameter you’d like to automate. With another perfectly hidden feature this also applies for incoming MIDI CC data. This allows writing CC sent from any knob of e.g. an external hardware synthesizer to a new automation track.
• Loop Automation
In many cases it’s not necessary or just too complicated to work in standard automation modes like “Touch” or “Latch”. For example if you have several different sounds spread over one track. One should become a bit louder, another two should be panned a bit to the left and some others should get different Filter/EQ settings.
Of course this could be done with DOP but for the mentioned examples automation feels more intuitive IMO and DOP does only work on audio events not on groups/busses, Instruments or Effect-Tracks.
On a Write-enabled track and with Loop Automation enabled you can play the part you would like to alter in a loop, adjust the parameter(s) you want and as soon as a cycle is done or you press stop, the last value is set as a static value in the loop range. This saves incredibly much time.
• Create Initial Parameter Events / Global Snapshot
This function in the Automation-Panel creates initial parameters for any automatable parameter (including Insert-Effects and VST-Instruments) for all tracks.
With Loop-Automation enabled you can then write all parameter-changes when switching plugin- or FX-Chain presets to a specific range.
With Global Snapshot you can learn the current state (in Stop-Mode) of all parameters and then apply to write-enabled tracks in Playback-Mode anywhere in the session.
• Passes
This one is very advanced. If activated you can try out and record different variation branches of an automation. The branching can be very simply (e.g. two different volume levels) or very complex. This is great is you feel unsure about the right value for an automation.
b) Editing Automation
This is something that is extremely powerful in Nuendo. Editing already recorded automation or drawing new automation with the mouse. Selected automation breakpoints can not only be adjusted in amplitude or be easily moved around with mouse. You can also stretch, compress, clinch, and tilt the selection. This offers perfect control for many sound design tasks.
Additionally you can draw beautiful Bezier Curves, Enter exact values for breakpoints (relative or absolute) and – I use this a lot – you can “mute” single automation lanes of one track while keeping the rest in “Read”-Mode.
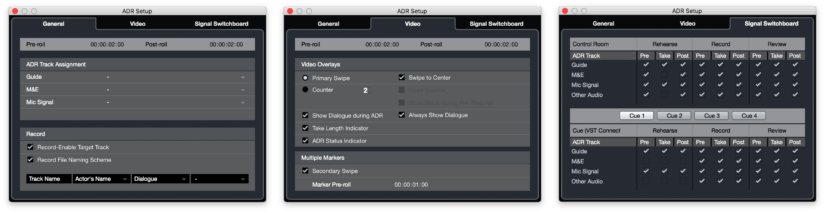
7. (Cycle-) Markers- / ADR-Panel
It doesn’t seem that special on first sight but this one is very powerful for recording, editing and overall clarity. First thing to mention is you can have multiple marker tracks, so you can have separate marker tracks/lists for e.g. sound effects, dialogue, music, ADR, Foley… As already mentioned these can be exported all merged or separately in .csv format, edited in a .csv compatible editor like Excel and then be re-imported to existing or new marker tracks.
Markers can have a lot of additional data like description, dialogue, actor, foley- or sound effect-type and many many more. With the ADR-Panel activated it provides a lot of great features for recording ADR, sound effects, foley or even music.
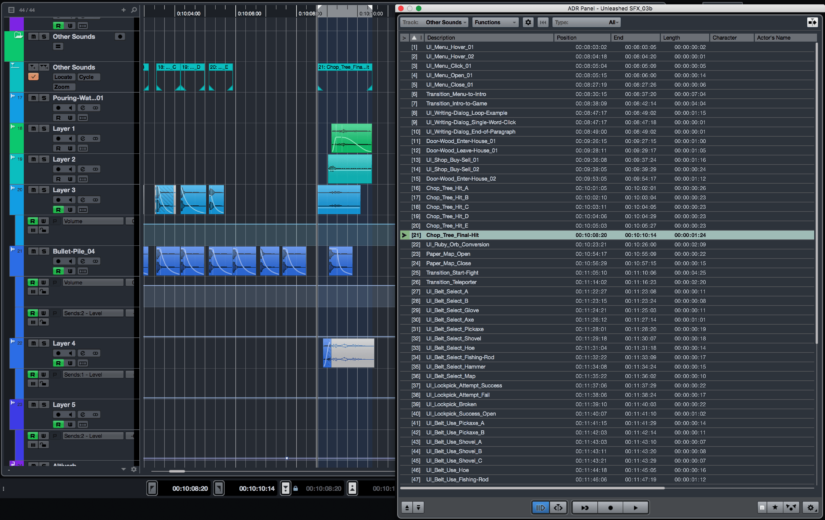
Just some highlights of the ADR-Panel:
• Define Guide, M&E and Mic Signal Tracks for automatic signal switching using the signal switchboard
• Automatically record enable target tracks by entering the appropriate track ID
• Pre- / Postroll with primary and secondary swipes as video overlays
• Show dialogue (taken from the Markers)
• Filenames can be created from Marker-Metadata (great for foley and sound effects recording)
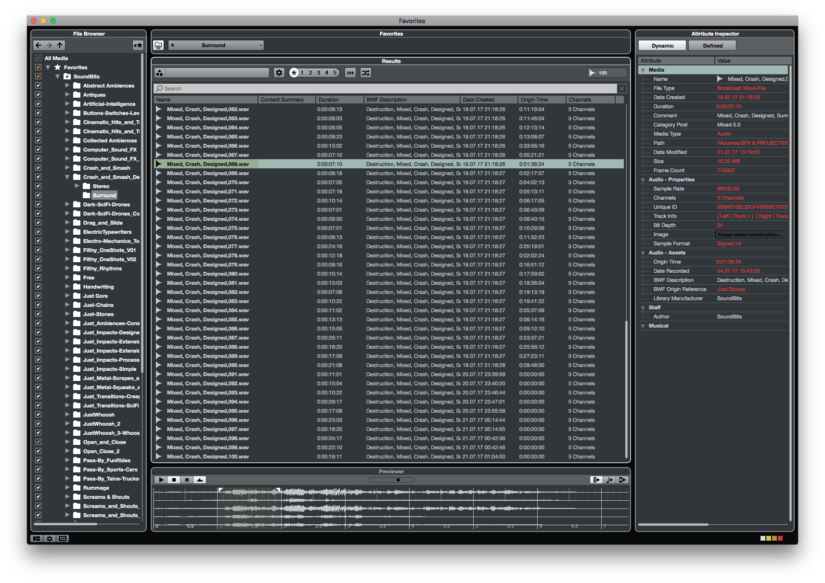
8. Media Bay and Pool / Library
a) When working with large sound effects libraries it is crucial to have a search engine / management tool that lets your create databases and and is capable of searching through metadata. Of course the Media is no Sound Miner but you get everything you need to organize and quickly search your sound effects database and get them into your project. Also Metadata editing is possible.
b) The Pool contains all audio- and video-events and Clip Packages that were imported, recorded or created in your session. With decent information on each event/file. If you accidentally imported an event without it being copied to the projects audio folder you can do this anytime with “Prepare Archive…” function. So nothing’s ever missing when re-opening a moved, send or archived session. Sounds in the pool A pool can be exported to use it another session and an extension of the pool is the Library. A new library can be created without any opened Nuendo (or Cubase) session. This way e.g. an assistant can search and gather sound effects, organize it in subfolders and I can then import that into my Pool. It’s also possible to pre-edit the sounds with any VST Plugin or Process like normalization or pitch shifting.
9. Sampler Track
The Sampler Track is a very intuitive sound design tool. It is like a sampler with basic controls like Pitch, Amp and Filter each with its own envelope.
You can easily drag&drop any audio file/event from an audio track, the Media Bay, the Pool, an Explorer/Finder folder onto an existing Sampler Track or create one from the context menu by right clicking an audio event and then instantly play it with a Midi Keyboard.
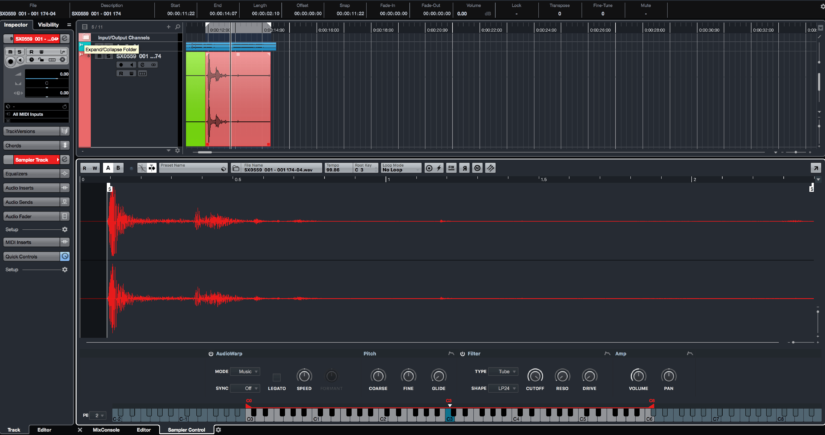
There’s still a lot which would be worth mentioning here but this would go beyond constraints here. So these get just a short mention.
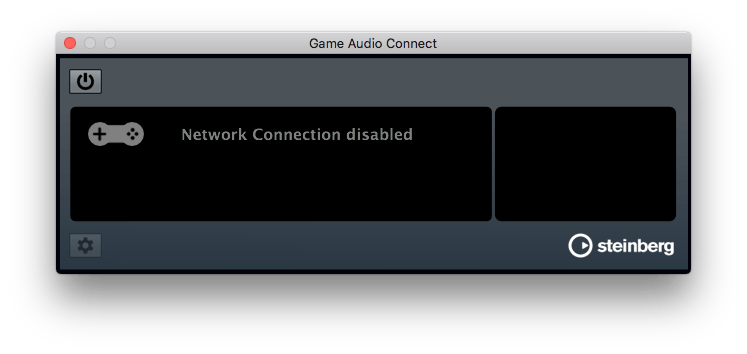
10. Game Audio Connect
Lets you easily access and exchange audio between Nuendo and the Game Audio Middleware Audiokinetic’s Wwise including Perforce versioning.
11. Ambisonics
Full Ambisonics support including 1st to 3rd order Ambisonics tracks, Ambisonics Panner, head-tracking and binaural down mixing.
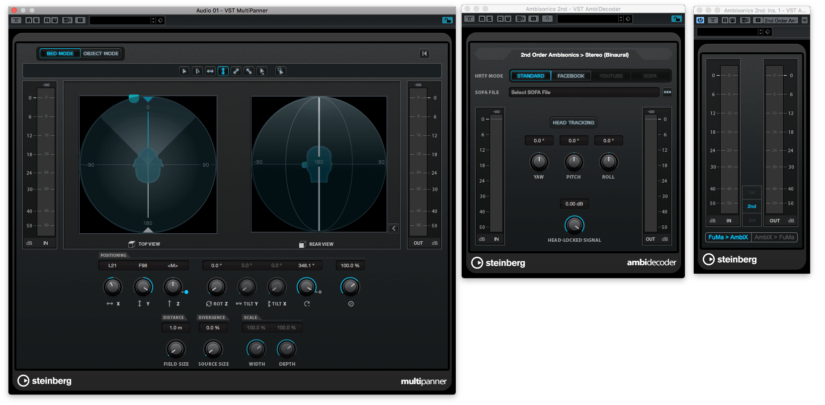
12. Multi-Panner and IOSONO Anymix Pro
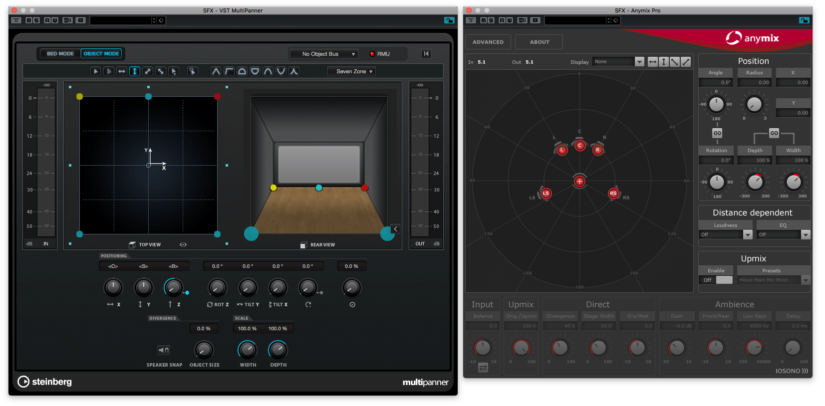
Nuendo is fully capable of mixing in a large selection of surround and 3D channel configurations including Dolby Atmos. With Nuendo you also get a full Version of IOSONOs Anymix Pro Panner Plugin which can be setup as standard panner.
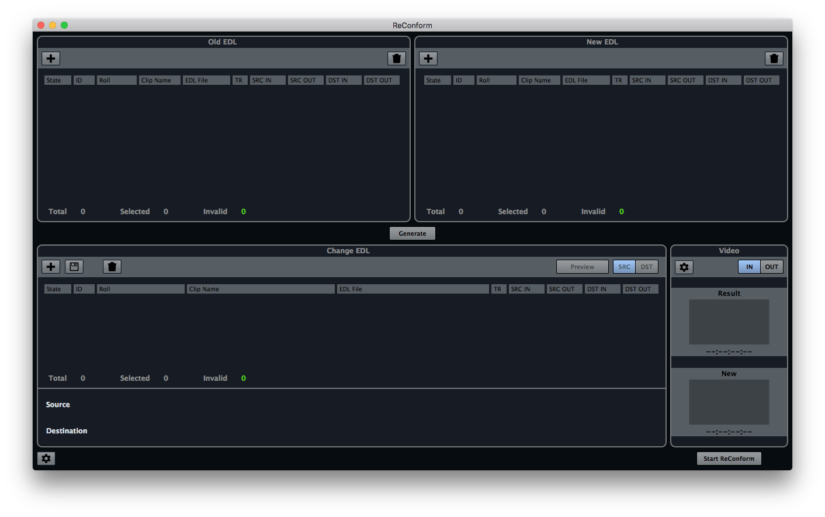
13. ReConform
To easily apply a recut to a whole session using EDLs.
14. Network Editing
Work simultaneously on the same session from different computers.
15. External Synth and FX
You can configure external hardware FX and Synthesizers to apply them like VST plugins.
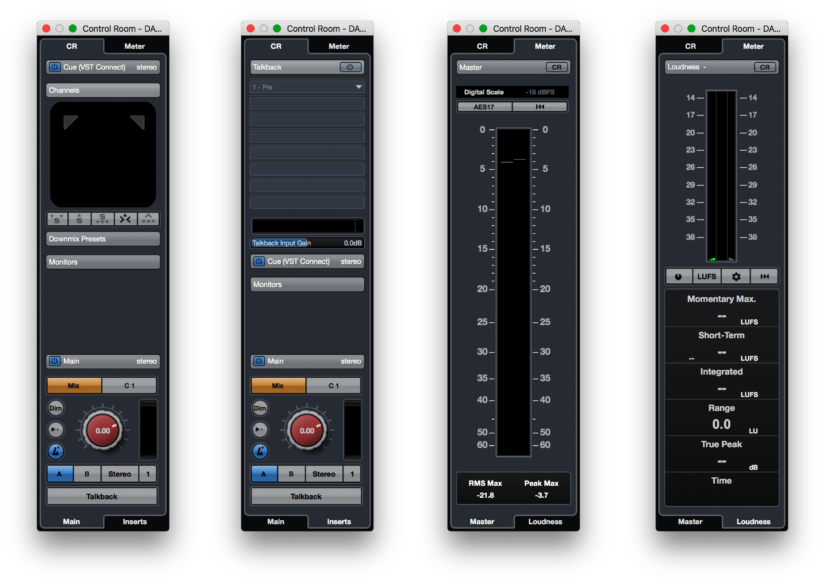
16. Control Room
Imagine the most thorough and versatile Control Room section you ever met.
A big thanks to Saro Sahihi for this in-depth guide to making the most of Nuendo for sound design! Be sure to check out his excellent sound effects libraries here.
