


Reaper for Game Audio – Part I: Starting Up • Transitioning from Pro Tools • Pro Tools Workflows and shortcuts • Actions Shortcuts • Preferences • Project Settings • Tracks & Routing
Part II: Rendering • The Render Window • Source or Render Modes • Region Render Matrix • Wildcards • Happy Rendering • Learn more about REAPER
Part I: Starting Up
I’ve been using Reaper for a while now and wanted to write about everything that I’ve learned and also explore the features that I want to know more about. This is mostly aimed at game audio but many things may apply to other fields.
It could be useful to know that I’ve been a Pro Tools user for many years so that is the base from which I’m judging my experience with Reaper. This first article will be a tour of the preferences and shortcuts with an emphasis on translating the best of the Pro Tools experience to Reaper.
Transitioning from Pro Tools
I have done a good effort to try Reaper’s workflows before adapting it to behave like Pro Tools. Having said that, after many years of daily Pro Tools use, I had a general shortcut workflow for editing and moving around the project that I thought it was a shame to lose so this is the main thing I “transferred” from Pro Tools.
It was amazing to see how easy is to customize shortcuts and mouse behavior in Reaper. Pro Tools offers some options plus you can use external tools to add even more but Reaper directly gives you full control. It is remarkable. For some of these to work, you need to tweak both Actions and Preferences.
Pro Tools Workflows and shortcuts
It was amazing to see how easy is to customize shortcuts and mouse behavior in Reaper […] Reaper directly gives you full control.
First, I re-mapped shortcuts for the main editing actions:
• A: Trim Start to cursor
• S: Trim End to cursor.
• D: Fade in to cursor.
• G: Fade out to cursor.
• B: Split items on cursor position.
• Ctrl + Shift + 3: Glue Items. Looks awkward but easy to reach with the left hand and already in my muscle memory.
Additionally, I’ve changed the scrolling and zooming behavior so it is more intuitive (for me, of course):
• Mousewheel: Vertical Scrolling.
• Mousewheel + Shift: Horizontal Scrolling.
• Mousewheel + Alt: Horizontal Zoom.
The mouse behavior felt a bit odd to me, particularly time selection, so I changed it to be more similar to Pro Tools. This can be accomplished in Preferences > Editing Behaviour > Mouse Modifiers, within the “Arrange view” and “Track” Context.
• Left click + Drag: Marquee Select items (This is changed on “Track” instead of on “Arrange View” which I found a bit odd.
• Right click + Drag: Select Time. (Changed in the Arrange View).
Actions Shortcuts
Reaper offers a great array of options to customize shortcuts, which you can access on the Actions menu. To get the most of this options, I recommend that you download the SWS/S&M extension which adds even more possibilities. I am still building my Reaper workflow but for now, here are some good ones you can consider adding to your repertoire:
Default Actions I like to use:
• Shit + Double click: Time selection as items.
• Alt + Left Drag: Offset item time. Fantastic for quick variation, really missed this in Pro Tools.
• Ctlr + Left Frag: Copy item.
• Alt + Click on take edge: Stretch item changing its sped (with or without changing pitch, depending on the take settings)
• Ctrl + Alt + R: Render.
Actions I’ve customized:
• CTRL UP/DOWN: Nudge Volume
• Shift + UP/DOWN: Pitch up/down 1 semitone.
• F: Make mono (L channel).
• Shift + D: Dynamic Split items (Pro Tools Strip Silence)
• Tab: Select next item (across tracks)
• Ctrl + Tab: Move cursor to next transient in items
• Arrow Up: Select and move to item in previous track.
• Arrow Down: Select and move to item in next track.
• Alt + T: Trim item to selected area.
• R: Reverse take
• Shift + R: Insert region from selected items.
• Shift + Alt + R: Create region like time selection.
• Ctrl + T: Create time selection to selected item.
Preferences
I am one of those weirdos who enjoy diving into a preferences menu. Again, Reaper offers an amazing amount of possibilities and options to tweak so your workflow doesn’t get in the way of creativity. It also includes a search box so you can quickly find what you are looking for. These are the preferences that I’ve found useful or nice to have for now:
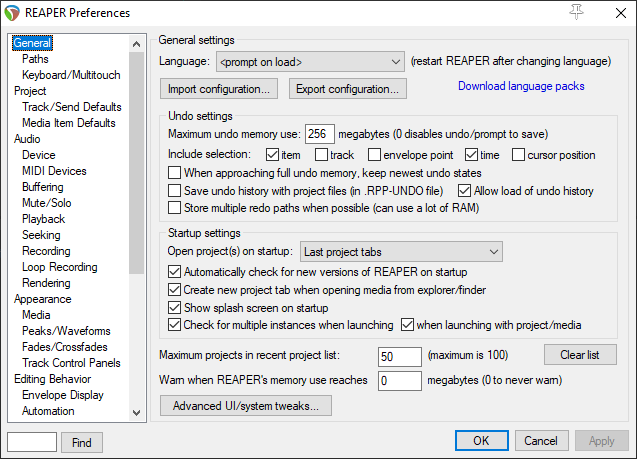
General -> Import/Export configuration: I use these to move around and back up all my settings, presets and bindings. Very neat.
Reaper offers an amazing amount of possibilities and options to tweak so your workflow doesn’t get in the way of creativity.
General>Paths -> I use a default render path so all rendered files go to a separate folder like on Pro Tools and Logic.
General>Keyboard/Multitouch -> Prevent ALT key from focusing main menu: Since I use alt + mousewheel for horizontal zoom, this prevents the main menu to go into focus each time I zoom. I was very happy to find this one.
Project-> On the “Project Saving” section, I’ve set up 5-minute project backups. I use a similar config in Pro Tools and it’s saved my ass more than a few times, although I haven’t had the need to use it with Reaper yet. I’ve also ticked the “Prompt to save on new project” so any work you do is always saved and in its proper place. This is a workflow that comes from Pro Tools where you can’t have unsaved projects.
Project>Track/Send Defaults-> I like sends to default to 0dB and post-fader here.
Audio>Device-> Nothing particular here but a good place to check that your soundcard is working as intended. I request a sample rate of 48Khz here since this is the sample rate I use for most work.
Audio>Mute/Solo-> By default, tracks get muted automatically when they exceed 18dB. Before I knew this setting existed, this caught me by surprise while working and I didn’t know what was going on. I left it as it was for now but I’m not sure if I like it.
Audio>Playback-> I unchecked “Stop/repeat playback at end of project” since this is quite annoying when you are working with the last take of your timeline.
Audio>Recording-> Nice to able to change the filename for recorded files and amazing that you can use wildcards here. I haven’t changed this yet but is very good to have.
Appearance>Media-> This section has some nice things to tweak so you can make the most of your screen real state. I like to uncheck “Draw labels above the item, rather than within the item” so there is more space for the waveform. I also like to have the item volume control as a knob.
Editing Behavior-> I like that the horizontal zoom center uses the edit cursor as I use this to navigate the projects.
Editing Behavior>Mouse Modifiers-> Very nice section to really customized how to use the mouse. I described my changes here on the Pro Tools section above.
Plug-ins>VST-> A useful section to keep in mind. Very nice that you can re-scan for plug-ins without restarting the software. Make sure you add all the folders you need with “Edit…”. Once you have them, don’t press “Auto-Detect” or you will lose them!
[tweet_box]Reaper for Game Audio – Starting Up & Rendering[/tweet_box]
Project Settings

When saving a new project, I always have “Create subdirectory for project” and “Copy all media items into project directory” ticked. This groups all the project-related files in one folder so it’s much easier to move around as a unit in a very similar way as Pro Tools. Once you set up these options, they will stay the same for any new projects until you change them back.
The Project Settings window is also good to keep in mind. Under the Project Settings tab, I make sure that the project sample rates is where it should be. Reaper manages sample rate in a very seamless way and you will be able to import any sample rate into your project but is good to establish a project rate. I usually don’t need to worry much about this since I do most work at 48Khz but is always good to double-check. Since I don’t usually work with music, I have the timebases set to “Time” instead of “Beat.”
On the Media tab, you can set where your files will be saved. The default is good for me. It is also important to make sure you have “On import of media to project” on “Copy media to project path” to make sure that all the audio that your project uses is saved together and your project will always work, even if you then move library files around. Set here your recording settings to Wav and 24 Bits or whatever you need.
The Video tab could be useful for setting the frame rate and preferred size, although I haven’t used much video yet.
Tracks & Routing
You can create a track just by double-clicking on the track section (left side).
On Reaper, tracks are content agnostic […] Any track can contain audio with any channel configuration (mono, stereo, surround, etc…) or even with MIDI or instruments.
On Reaper, tracks are content agnostic which I found crazy at first but soon enough I realized it was brilliant. Any track can contain audio with any channel configuration (mono, stereo, surround, etc…) or even with MIDI or instruments. So no need to create a track for each thing like on Pro Tools.
Parent or folder tracks are also a very handy feature. You can make a track a child of another track which means the child’s output will go to the parent input. The parent track will show an outline of all the audio contained on the child tracks but can also contain audio itself. Arranging tracks this way helps grouping them and organizing them. You can then apply the same FX to all tracks through its parent and also use the parent to render the resulting mix.
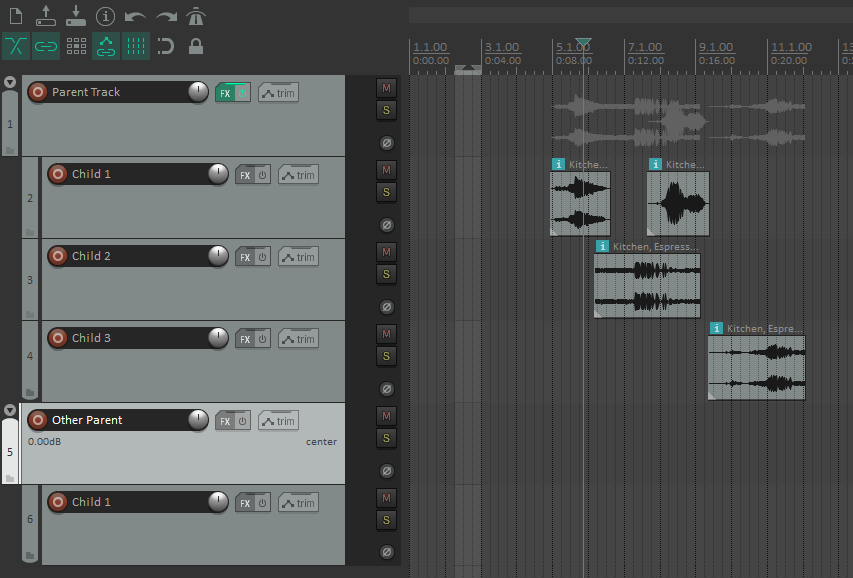
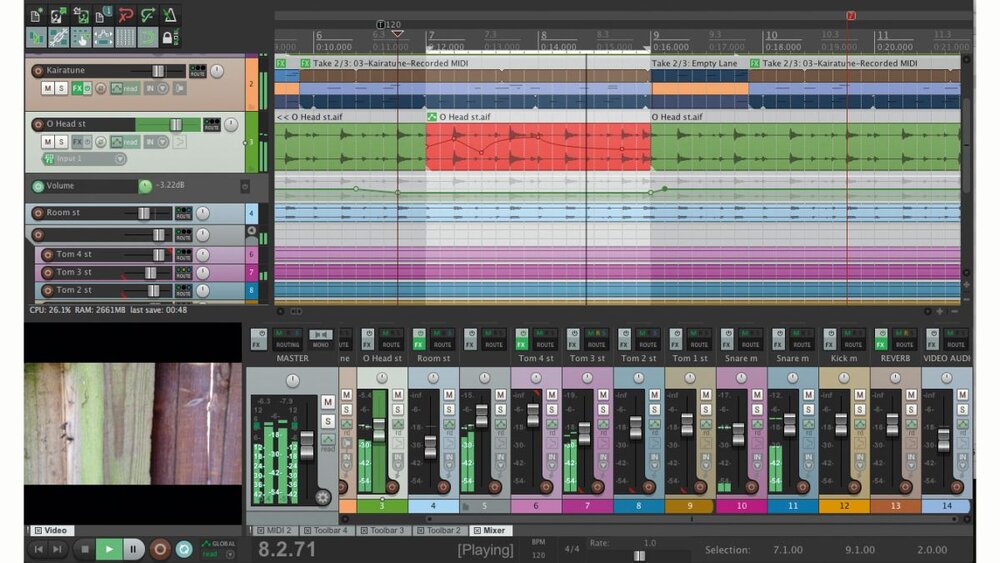
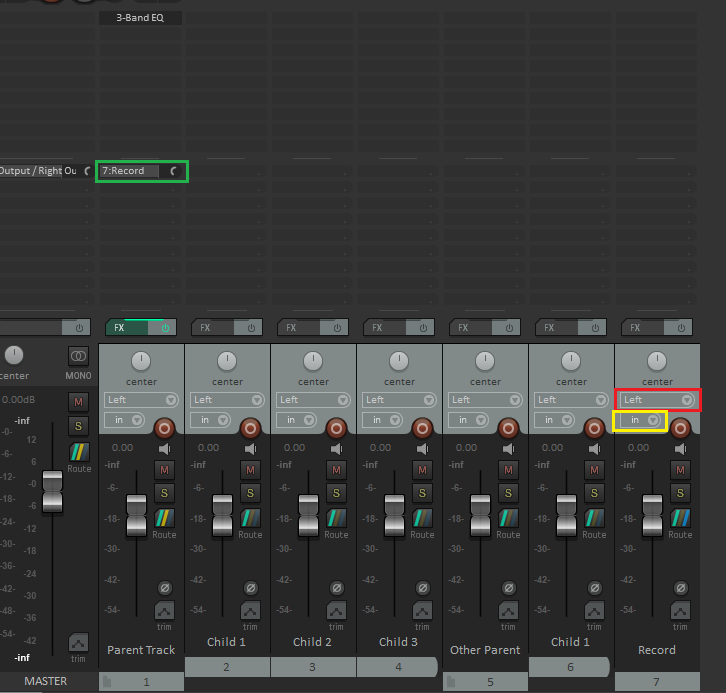
Folder (or parent) tracks already take care of much of the routing since they connect in the way you expect by themselves. For sends, just use the mixer view (click on green area, see picture below). No need to create buses, you just select the track you wish to send to under the “Sends” section.
To record a track’s output on another track, you need to do something a bit odd. As you can see below, the first option marked in red represents the hardware and MIDI inputs. There is where you choose which input from your sound device you want to use. The second, marked in yellow, lets you choose what you want to record on the track including an output option which really means an output from another channel that is routed into the track. Quite confusing, I think.
So in summary, to record a track’s output on another track: First you need to send the audio from one track to another. Then, on the track you wish to record on, change the record section from “in” to “out”. This way, the track is not recording inputs (like your sound card input) but the output of the track that is routed to it. I think Pro Tools managed this in a more logical way, although you had to deal with buses.


Part II: Rendering
Rendering was probably the first feature that impressed me about Reaper. Being a Pro Tools user, the amount of possibilities is huge.
On Reaper, “rendering” represents many different ways and options for producing audio files from your project in a very flexible way.
Pro Tools calls it “bounce” while other DAWs use the term “export”. Reaper uses “render” which expresses well what is going on. Pro Tools “bounces” in a way that is close to analog technology, at least in workflow. And we only got offline bouncing on Pro Tools a few years ago. On Reaper, “rendering” represents many different ways and options for producing audio files from your project in a very flexible way.
The Render Window
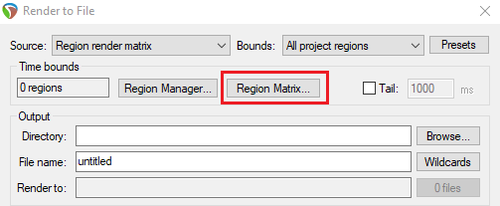
First, let’s have a basic look at the render window, which you can open by default with “Ctrl + Alt + R”. After this, I will go into more detail about some of the features.
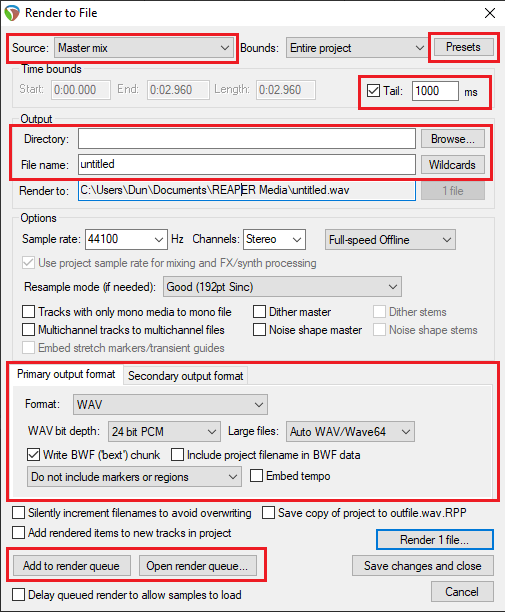
Many options to take into account, most of them are self-explanatory but nevertheless here are some to keep in mind (marked in red above):
•Source: This lets you choose where would you do your render from. By default, “Master mix” works the same as a bounce in Pro Tools but there are a few other types that are very useful and we will see in detail.
•Presets: You can save render presets which is very handy so you can consistently create files with the same settings or when your rendering needs keep changing within the same project.
•Tail: Careful with this one. It is on by default and you may not need it. It adds some extra time after a render. Super useful when rendering audio that is going through a reverb if you want to leave a decay time for it.
•Directory: You can render anywhere that you choose. My personal preference is to render on a “Renders” folder within the project folder itself. As I explained on the first part of this series, you can get this set up on Preferences > General > Paths.
•Fine name & Wildcards: Like any software, you can name your files however you want but that can be very limited if you are trying to render a set of files with a determined naming convention. Wildcards give you the possibility of naming things dynamically, getting information from the project, tracks, children, parents, current date and so on. Very powerful.
•Output format: You can use a few different formats, and even embed metadata. There is a secondary format available in case you want to render in both wav and ogg, for example.
•Render Queue: This is a nice option to have if you need to set up a bunch of renders. Just add them all to the queue and you can render all at once.
Source or Render Modes
Let me go into a bit of detail on this section since it is very powerful.
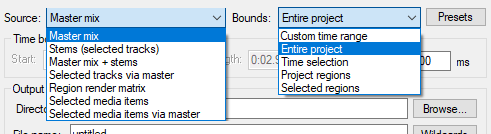
•Master mix: As mentioned, this works as a standard Pro Tools bounce. It would just render whatever goes through the master channel. You define which section of the project with the “Bounds” option. As you can see, you can do the whole project, your time selection, certain regions, or a custom time range. Pretty much anything you may need.
•Stems: Your selected tracks’ output including their FX and automation.
•Selected tracks via master: Similar to stems but if a track is in a folder (has a parent) those FX would affect it too.
•Selected media items: Renders every media item that you have selected as a separate file.
•Selected media items via master: Same as above but parent tracks affect items.
•Region render matrix: This option is so cool and different that it deserved its own section!
Region Render Matrix
This option allows you to select which elements you wish to render based on the regions you have in your project. Maybe it doesn’t sound that exciting but for video game sound effects or VO, where you need to create many small files, is quite powerful. Let’s see an example:
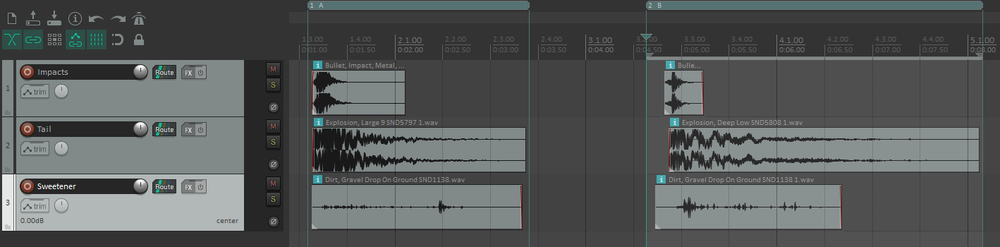
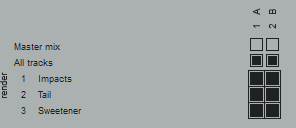
As you can see above, we have 2 different regions named A and B. We then have 3 tracks and two sets of sounds on each one. Now let’s say that we want to render all these items individually and we want to do it based on the region they belong to.
If we select “Region Render Matrix,” we can then click on the “Region Matrix” view.
On this view we can see a graphical representation of the editor. Regions appear as columns, while tracks are rows. Where a region and a track cross, we find a square to represent this. If we select said square, we can render this specific track but only for the regions we wish. This is great for game audio since you sometimes want to import sound separated by layers so you can manage variations on the middleware side.
The Render Matrix allows you to export multiple files from multiple tracks and regions in an automated way.
If you think about it, this kind of a hybrid render mode, based on the tracks’ content and regions at the same time. Remember to use the tail option if you need it for reverbs or other effects. You can also mark the “Master mix” row for any region and get the mix of your elements also.
The cherry on top is to combine this with wildcard naming.
Wildcards
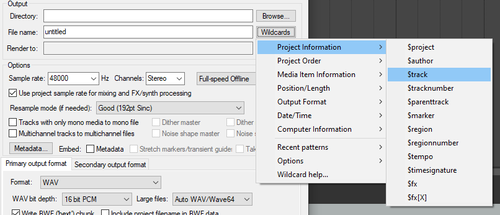
This is a very neat feature that gives you a lot of power and flexibility to name your files.
Wildcards allow us to create formulas with context depending ingredients that will create the name for our files in a smart way.
Wildcards allow us to create formulas with context depending on ingredients that will create the name for our files in a smart way. As you can see, we can use a lot of information that comes from our project, tracks, regions, and all sorts of things including time, date and the computer itself.
So for example, let’s create a naming scheme for the project showed above. I’ve changed things a bit, there is one more variation now and I grouped those tracks into a folder. I also created a new track for a different event that want to create. Have a look:
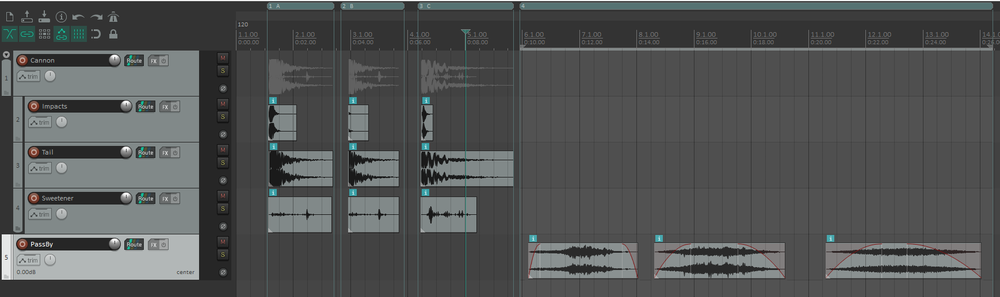
Ok, so let’s say we want to render the tracks within the Cannon folder individually so we can play with them later. As for the pass by sound, this is just a simple one layer sound and we have 3 variations so it would be nice to number them sequentially. All of this is easily achievable with wildcards.
For the first set of sounds we can use: $project_$parenttrack_$track_$region, which would result in something like “AwesomeEnemy_Cannon_Impacts_A” for the first item on the first track and something like “AwesomeEnemy_Cannon_Tail_C“ for the third element of the second track. As you can see, we are inheriting all these names from the project and tracks names. From the regions, we are getting their names and also their bounds define how much of the tracks we want to render via the render matrix.
Notice how when we are building the formula, we can see below how the result would be, which is useful to make sure you are getting what you want.
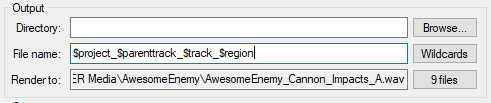
For the second set of sounds, notice that they are all on the same region. Since we want to render each variation, we could create a region for each but in this case, it may be easier to just use the “selected media items” render mode and simply select them. We can still use the region name and/or number in our naming formula if we wish. In this case, there is no need. So we could use: $project_$track_$timelineorder[00]. That last bit of the formula would number each item sequentially, as they appear on the timeline, starting with “00” and then going up like “01, 02, 03…” and so on. The result is: “AwesomeEnemy_PassBy_00”
As you can see, it can be very convenient to save these settings as presets, so you can use whichever is closer to what you want in each case.
Happy Rendering
I hope this gave you a nice overview on what you can achieve with all the different render workflows that Reaper offers. Anything that allows you to work faster and focus on the creative side of things is always welcomed and I think Reaper shines more than any other DAW in this area. See you next time!
• Make the most of REAPER as a sound design tool – part 1: Getting Started
• Make the most of REAPER as a sound design tool – part 2: Workflow
• 5 useful tips for making the most of REAPER
• Video: How to edit and process field recordings entirely in REAPER
• The Rise of Reaper – with Justin Frankel
• Join the REAPER channel on the Sound Community Discord server
A big thanks to Javier Zumer for giving us a behind-the-scenes look at how to use Reaper for Game Audio! Learn more about his work here