


What goes into creating a noise sound effects library? Quite a bit, as you’ll hear from sound designer and recordist Yarron Katz. Here, he offers the the story behind his debut library – Whirs, Buzzes, Hums and Hiss – and a practical guide to noise reduction, without a noise profile:
Written by Yarron Katz
Examples from the Whirs, Buzzes, Hums & Hiss SFX library
If you asked me if I could go back and make this sound library all over again, would I do it?
Absolutely not.
This library was an enormous challenge. Initially I thought that making a library which primarily captures noise sources would be an easy endeavor to kick off with. Little did I know I had just jumped into the deep end of restorative post production.
So you ask, “What could be so difficult?”
For starters, most of the sounds can’t fit in the studio. You can’t exactly squeeze a power station into your sound booth, and trying to move a walk in fridge is just asking for a hernia. So you have to record them in the field where you can’t control the surroundings. And it’s not just one location, it’s many. That means time.
The next issue: Machinery tends to make a lot of different noises at once. Your power generator is going to have a compressor running, a fan running to cool it, and all sorts of plastic and metal rattling from the motion. Have you ever tried to remove multiple noise sources from a noise source?
And lastly… decisions.
Which part of the sound to keep? Which to remove? How much to remove? When you record sounds like a human voice, a footstep or even a gun shot, you know exactly what constitutes the needed sound and what is unneeded noise. Not so easy with mechanical devices. The sounds are all enmeshed in a sort of cacophonic marriage. Initially I made the sounds as clean as possible focusing on the specific sound I wanted. To continue with the power generator example, that meant I tried to remove as much of the rattling and fan as possible and just leave the compressor sound. A classic mistake I was aware of. Yet despite my experience, I still made it.
You see after a few days I listened to my work with fresh ears and realized none of the material sounded natural. That extraneous noise gives them a lot of life. So I went back and re-did all of them. This time with the new goal of giving it the most authentic character. My aim was to get it to sound the way it naturally sounds, carefully removing just enough noise to preserve the natural character. This gives the end user maximum control to boost or cut where they feel necessary for their specific production.
So with that said, let’s see a few examples how I went about the painstaking process of cleaning unneeded noise from needed noise.
With most sounds, standard procedure is to loop an isolated sample of the background noise, then have your noise reduction plugin “learn” that noise profile and remove it. But when the noise is an integral part of the sound itself and there is no profile, one has to resort to different tools.
Enter Dynamic Equalization and Multiband Expansion. The concept behind both are similar. A frequency range is lowered unless its volume reaches a specific threshold. When it meets that threshold, it is increased. The idea is that the noisy part is kept underneath the needed sound that breaches the threshold.
Let’s start with one of the most problematic sounds I had. An electricity line.
Before
Enter the WAVES WNS. Under the hood, this is a variable 6 band Dynamic Equalizer with an algorithm designed to preserve speech. An alternative plugin is the Cedar DNS (but you have to be a lot richer than me to own it).
I loaded my first instance, focusing on the bass and upper mid range area:
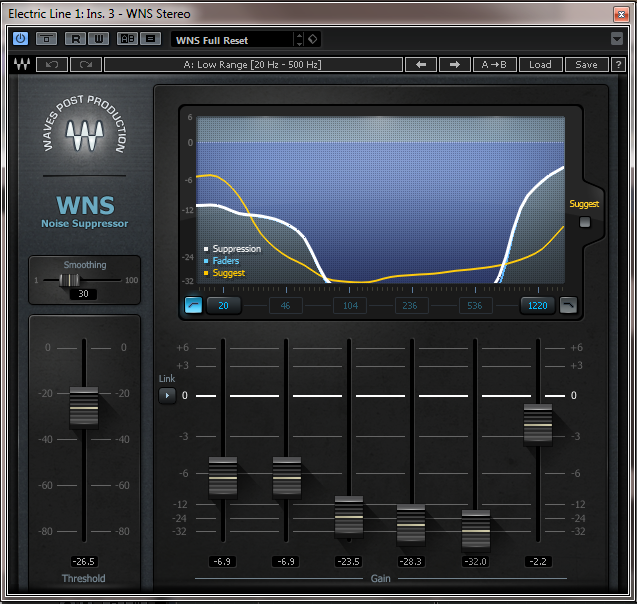
Drastic noise means drastic measures. Heavy reduction was applied to the Bass region up to 536Hz.
I could apply a heavy hand with the lower Bass region since it was redundant for electric spark sounds. However getting further up the range needed a more delicate hand.

A lighter touch is applied to the mid range region, since this is more critical to the sounds character.
After
The end result. From unusable to exceptional.
Let’s move on to something not quite as drastic. CB Radio Static.
Before
In this case, the microphone’s character boosted the white noise too much. I felt that it was stealing the thunder of the sounds natural haunting presence when I heard the real thing.
So first out came, the WNS:

As you can see, I focused on the 4K – 16K frequencies. White noise zone.


This took away the major offense at 4kHz but there was still unwanted hiss. Time to find a gentle reduction plugin that did a good job of preserving the rest of the character.
The WAVES W43 has a very smooth sounding noise reduction. Unlike the WNS, the W43 (based on the Dolby Cat43 hardware) uses Multi-Band Compression under the hood and has 4 bands locked frequency bands.
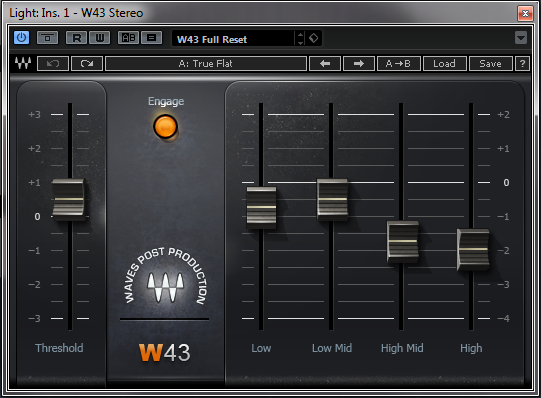
In the case of the W43, the true flat setting isn’t with the faders at 0. So contrary to how it may appear I’ve actually only gently reduced the High and High Mid bands and slightly increased the Low mids. The Low fader is unchanged and technically flat.
The slight reductions I made in the treble gave the result I needed and the increase in the Low-Mid brought a little more warmth to the signal.
After
Now we definitely had the old school CB radio sound I was looking for.
In theory one could simply pull out a stock EQ and reduce the 4K frequency range. It’s certainly quicker and it will probably get you a result that’s 80-90% as good. Like most things in life, this is a case of diminishing returns. What that means is that at a certain point it start costing dramatically more to get smaller improvements. The same applies to sound design. To get that extra 10% means that you have to spend a lot more time. The perfectionist like me will spend the extra time. The benefits are you constantly hone your skills, get faster at difficult tasks and are always learning. The downside is you could be spending that time learning social skills. This is why I’m a bachelor with 2 cats.
And moving on to our final sound, this time we’re going to use a more classic noise reduction plugin with a difference.
The Waves Z-noise. A classic NR plugin that learns noise from a profile. However when you don’t have access to an isolated noise profile, Z-noise has an Adaptive setting that looks out for consistent noise patterns in the signal. An absolute winner for this sort of thing. An alternative would be the Izotope RX Dialog Denoiser.
Let’s grab a fridge sound and get to work.
Before
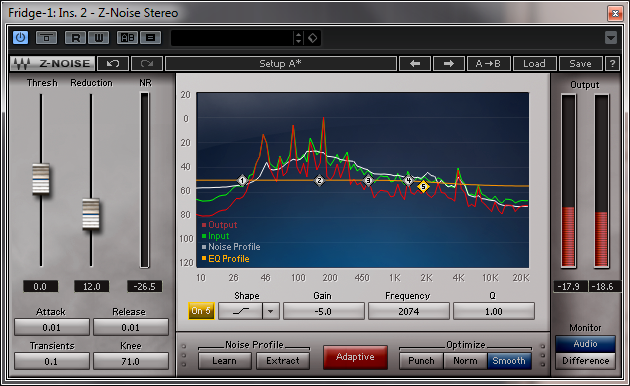
The adaptive setting is enabled. In the above example, I have reduced the noise reduction algorithm by 5dB at 2074Hz and up to preserve the upper character of the sound which was not as affected by noise.
Once the plugin analyzes the material to create its own profile of noise, you can then fine tune which noise frequencies get more or less reduction, with 5 frequency ranges and a variable Q.
After
Sometimes things just work like magic…
So we’ve looked at applying 3 different plugin types on different material. The question you may ask is, when do you use what? That is a matter of experience. Learning the ins and outs of each plugin and developing an intuition for their ideal application. When in doubt, test a few. At the end of the day I found myself using many different plugins from different companies. There is no best plugin. Sometimes one plugin works better than another for a particular sound, but is worse for a different sound. The key is to know the strengths of each and apply them where they work best.
So on that note be sure to check out the Sound Library. I bid you good luck with your restoration and bye for now!
Yarron out.
About the author
Yarron Katz has worked on sound design for companies such Square Enix, Zynga, DeNa and Intel among many others. He’s just opened Sonic Worlds giving you access to top tier sound effects. You can check out his first Sound Effects Library here.
A big thanks to Yarron Katz for sharing his expertise! You can get the full library below: