reaper sound editor interview Asbjoern Andersen


Want to use REAPER for sound design? In this 2nd part of her special guide, Anne-Sophie Mongeau shares her tips, tricks and insights that get you the optimal workflow (and, if you missed it, part 1 – covering how to get started with REAPER – is here):


Written by Anne-Sophie Mongeau


Following the first article of this two-part series where I listed a few tips and habits to observe when getting started with Reaper, I would now like to explore this DAW’s workflow as well as some of its unique features to take advantage of when using it as a Sound Design tool.


Workflow

Track hierarchy

Create a pseudo master track.
I strongly recommend never touching the master track. This means not adjusting its volume fader, and not adding any effects or plug-ins to it. The way I see it, a master track is like a master volume knob in the studio: you’re not supposed to touch it once your studio is calibrated. It’s a point of reference. You need to be able to rely on its VU meter and know that it is an accurate reading of the final output. This is done by leaving this track untouched. In addition, if the master track has been modified, either in volume or in effects, any sound files added to the project will automatically be affected by it.

In order to avoid touching the master track, the solution is to create a pseudo master track. This allows to treat this track as if it was a master track, on which you can apply a limiter or compressor if necessary.

The way to do this in Reaper is fairly simple:
• Create a new track (Ctrl+T or Double-click in the tracks section of the editor window);
• Click the folder icon at the bottom right of the track. This way, any additional track will be created as a child of the parent folder track. You can create as many folder tracks as necessary underneath this pseudo master track.

reaper track hierarchy

Use the folder tracks
The folder tracks are one of Reaper’s workflow changing features. They basically allow for extremely easy and quick routing, as well as being very intuitive and visually consistent.

My sessions are usually carefully divided using the folder tracks, allowing me to easily mute/solo/process an entire section of my project.

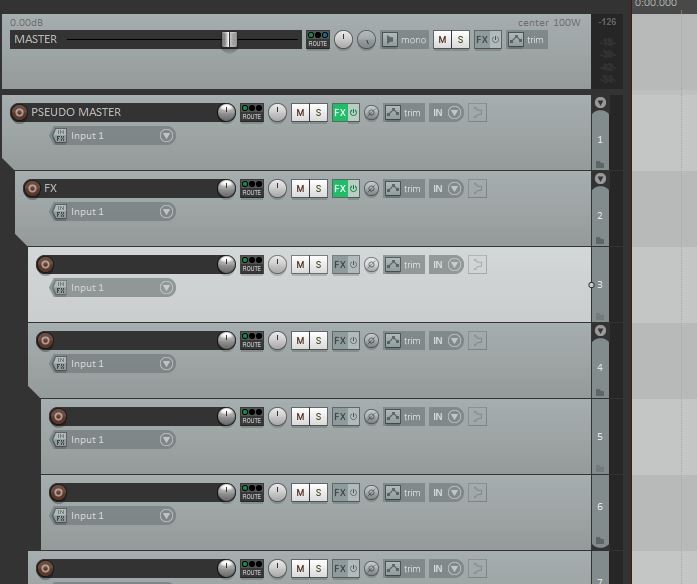
The tip above (create a pseudo master track) fits within this use of folder tracks. In addition to this pseudo master track, on which I usually only have a limiter/compressor (if anything), I create a parent track which will hold effects that are intended to affect the entire project. That way, any processing effects are sure the come before the pseudo master track and its compressor/limiter in the chain. My track hierarchy usually looks something like this at its simplest:

reaper folder tracks
 

Need more help with REAPER? Get it here:
 
Looking for more help with REAPER, or do you want to read or share tips, ideas and resources? Visit the new REAPER channel on the Sound Community Discord server here

Mouse wheel and right click

Reaper has a very mouse oriented workflow (as opposed to featuring various tools), where the wheel and the right click quickly become your best friends. It sometimes act quite differently to other popular DAWs, so it may take a little while to get used to. Being well adapted to it now, I can tell you that I sometimes wish this workflow was found in every single software that I use daily. But keep in mind that if you really dislike it, you can always change it in the Reaper Preferences.

• Scrolling the mouse wheel
Scrolling the mouse wheel will zoom in and out in the editor, using the edit cursor as its point of reference by default. You could change this to the mouse cursor if you’d rather zoom where your mouse is.

• Ctrl+Scroll
Pressing Ctrl and scrolling the mouse wheel will enlarge or shrink the tracks sizes. This is useful if you have a substantial project and you wish to quickly have a better overview.

• Alt+Scroll
Pressing Alt and scrolling the mouse wheel will allow you to move from left to right in the editor window. I personally swapped the Ctrl and Alt functionalities: Ctrl+Scroll will let me move left and right, and Alt+Scroll will allow me to enlarge/shrink. I find it a bit more intuitive this way. Again, all of it is highly customizable.

• Ctrl+Alt+Scroll
Pressing Ctrl+Alt and scrolling the mouse wheel will allow you to move up and down in the editor window. You could also simply scroll your mouse wheel within the tracks section of the editor window for the same result.

• Left Click+drag
Making a selection using the left click will create a time selection. This is useful to create regions, looping and rendering (amongst other things).

• Right Click+drag
Making a selection using the right click will allow you to select items within the editor window. It takes some time to get used to this as usually you would select items with the left click, but once you do get used to it, the workflow becomes seamless and intuitive.

• Left VS right click
The left click (within the editor window) will usually be used for anything editing/cursor related. You can select one single item with the left click, or select multiple with Ctrl+left click or Shift+Left click. The right click will always show all available options for the respective clicked item/area. Both of these quickly become vital while their combination really covers all actions you would want to perform within the DAW. There is no need for additional tools and such.


Popular on A Sound Effect right now - article continues below:


Trending right now:

  • Bloody Nightmare is a modern horror cinematic library aimed at the most cutting edge bone chilling productions out there.

    Whether you work in sound design, as a composer, trailer editor or as an electronic musician, Bloody Nightmare is a valuable new wave of Horror sounds that will surely cause visceral moments of terror and dread!

    91 %
    OFF
  • Introducing MOTION GRAPHICS, a complete Motion Graphics sound effects library from SoundMorph!

    Motion Graphics focuses on all the elements you might need for sound design on a trailer, a cinematic scene or a visual that is heavy with motion graphics, whether it be abstract or straight forward, Motion Graphics has all the elements and textures you could think of. Motion Graphics are something all of us sound designers run into at one point or another, so this library is an excellent addition to your sound effects tool box.

    Motion Graphics was created by and in collaboration with sound designer Rostislav Trifonov (SoundMorph Elemental library contributor).

    Motion Graphics features 650 24bit/96 kHz .wav files, all meticulously embedded with Soundminer & Basehead metadata.

    The library features:

    • 450 + designed sound effects
    • 190 + source audio files
    • Whooshes
    • Impacts
    • Risers
    • Stingers
    • Low end and Sub Bass
    • Impulse Responses
    • Passbys
    • Textures – noise, grit, glitch
    • Ambiences
    • Buttons and Clicks
    • Mechanical Elements
    • Granular effects
    91 %
    OFF
  • ⏰ For a very limited time:
    Add this library to the cart and enter ah4launch in the cart coupon field – to sprinkle an extra launch discount, on top of the current discount!

    Animal Hyperrealism Vol IV is a sound library containing animal vocalisations, from real to designed creatures totaling more than 2000 individual sounds in 294 files. The sounds were recorded in zoos, and wildlife centers.

    The asset list includes but is not limited to: hippos, hyenas, vultures, dwarf mongooses, elephants, African cranes, parrots, tigers, pigmy hippos, rhea ostriches, brown bears, pheasants, wildebeests, African wild dogs and many more. The content has been recorded at 192KHz with a Sanken CO100K, an Avisoft CMPA and a Sennheiser 8050 for center plus two Sennheiser MKH8040 for stereo image.

    The resulting ultrasonic spectrum is rich and allows for truly extreme manipulation of the content.

    15 %
    OFF
  • Cute but Deadly Chihuahua is a Mini-Library consisting of barks, snarls, growls, yelps, whimpers, breaths and chuffs from my late dog Bellatrix. This library contains about 10 minutes worth of her vicious vocals and frustrated whimper yelps. This library really shines when you play with pitch and speed creating cute alien vocals or horrific monster growls. I’ve used these recordings in various feature films such as Piranha 3DD and The Devil Inside. She may be gone but her bark lives on!


Latest releases:

  • A collection of 135 potion sound effects.

  • A collection of 140 individual power up ability sound effects.

  • A collection of 103 bowling sound effects.

  • São Miguel – Flows (supporter pack) is a collection that includes 14 looped files.
    The palette explores the sounds of the ocean, waterfalls, and hot springs. These recordings were captured in Moihnos (Cascata do Limbo, Praia dos Moihnos), Ribeira dos Caldeirões, Ponta do Arnel, and Furnas (Caldeira).
    Recorded in 96 kHz/24 bit, these sounds are easy to navigate and were captured using a Sony PCM D100.

  • ATTENTION: The audio preview only simulates gameplay to demo just a portion of the library’s content.


    Reward your players with the jackpot of 340 high-quality (170 original sounds), easy to use audio files that provide you with all the sports-themed audio your games will ever need!

    Create a casino masterpiece and a true immersion in your slots with this one-of-a-kind collection of royalty free sounds and music, expertly handcrafted to be a perfect fit for your games.


    ALL SLOT GAME ELEMENTS YOU WILL EVER NEED

    With numerous INTERFACE SOUNDS, such as REEL SPIN START BUTTONs, REEL SPINNING noises, REEL STOPs, BET INCREASE and DECREASE sounds, and all other interface buttons and TRANSITIONS, as well as WIN PAYOUT SOUNDs, such as short WIN TUNES, MUSICAL PAYOUT ROLLUP COUNTERs, SELECT and REVEAL jingles, various SYMBOL sounds, and FREE GAMES / FEATURE MUSIC LOOPs to fit any scene or situation (from strip-back relaxing background to upbeat catchy themes), this library is a perfect choice for your Online Video Slot, Mobile or even Land-based Casino Games!


    SPORTS-THEMED SOUNDS FOR YOUR FEATURE GAMES

    Need BASKETBALL game sounds, SOCCER / FOOTBALL, HOCKEY, BASEBALL, GOLF, TENNIS, TABLE TENNIS / PING PONG, SKIING / BOBSLED, SWIMMING or WATERPOLO, BOXING and even more? We got you covered!

    With all essential action and foley sounds for most common Oympic Sports that have been included in this pack, along with ambiences and miscellaneous sounds – such as AIR HORNS, ARENA AMBIENCES, CROWD CHEERING and CHANTING, JUDGE WHISTLE, and more – this sound effects library will leave nothing to be desired!


    ENGAGING SPORTS MUSIC IN ALL GENRES

    Immerse your players in gaming experience like no other with almost every music genre commonly found in sport events, games and tv program. We have also included multiple variations and edits to make your workflow as fast and easy as posible.

    From INDIE ROCK, HARD ROCK and METAL, to multiple sub-genres of ELECTRONIC Music, FUNK, ROCK BLUES and other genres, from SHORT STINGS, JINGLES and DROPS, to LOOPS, music mixes in VARIOUS INTENSITIES, included content here is a must have in your audio collection.


    With each audio file being drag-and-drop ready, presented in high quality MP3 and WAV formats with meticulously labelled keywords for your convienience, you will create the perfect gaming experience for your players in a matter of moments!


    So STEP UP YOUR SLOTS, GRAB ATTENTION and BUILD CONNECTION with YOUR PLAYERS! 

    DOWNLOAD NOW!


    SPORTS SLOTS at a Glance:

    • Symbol Sounds, Buttons and other Interface Sounds, Reel Spin and Stops, Trigger Sounds, Selection and Reveal sound effects, Music Loops for every scene and situation, Win Tunes and Rollups, Payouts and other short Celebration Tunes + much more!
    • Sports-Themed Feature Sounds: Basketball, Soccer / Football, Hockey, Baseball, Golf, Tennis, Table Tennis / Ping Pong, Skiing / Bobsled, Swimming, Waterpolo, Boxing and more
    • Numerous Variations and Edits of the assets, such as multiple lengths, intensities, looping and non-looping variants, and more;
    • Ready to use – requires no editing, labelling or splicing. Categorized, organized and individually labeled files for maximum use efficiency;
    • FREE Updates to higher versions, FOREVER!

    Enrich your slot IP in seconds with beautifully mixed, AAA quality sounds brought to you by our team of industry veterans, whose 1000+ slot games worth of experience have culminated in this extraordinary sound pack!


    DON’T DELAY any longer, you are only a step away from bringing your game to life. Take action and DOWNLOAD NOW!

    10 %
    OFF
Need specific sound effects? Try a search below:


Regions and markers

The regions and markers are often underestimated tools that can both help you navigate through your project and help the rendering process.

• Regions
To create a region, make a time selection (left click+drag) within the editor window; Right-click within the time selection > Create region from selection (or press Shift+R).

Once a region is created, you can move it anywhere in the project, and all its content will be moved along with it. This is very useful when working with sections of a composition, or designing a sound which has multiple parts (for instance intro, loop, outro).

You can navigate quickly between regions by pressing Alt+ . You can edit a region by pressing Shift+Double click on the region.
render to file

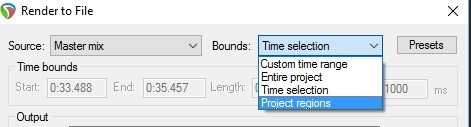
You can render one or more regions by selecting Bounds: Project Regions in the Render to File window (Ctrl+Alt+R). This is extremely useful and saves a considerable amount of time when working on multiple variations of a layered sound (for instance impacts or explosions, where you may have multiple layers). Once you are happy with a few different versions, you can simply create regions for their respective variations and render the project regions.

• Markers
To create a marker, the default shortcut is M. This will add a marker to your current edit cursor position, of which the number will follow the last marker added. Just like the region, you can edit a marker by pressing Shift+Double click. You can name it, color it and set its number ID.

You can move through markers by simply entering the number of the desired marker (1,2,3,4, etc). This is very useful when dividing your timeline in different sections. For instance, footsteps on various materials could be divided and identified with markers, so that you can navigate quickly between them.

Finally, Reaper offers a few options when rendering, such as including markers and regions, markers only, markers starting with # only, and more. There are a few reasons why you would want to render with markers, and working with a game audio engine such as Fabric may be one: detecting markers within music sound file is part of the integration process.
 

The Media Explorer

The Media Explorer is a powerful media browsing and import tool native to Reaper.

reaper media explorer

To view it, press Ctrl+Alt+x (or View > Media Explorer). You can create as many libraries as needed on the left hand side section. I usually have a library that regroups every single sound libraries I own (either from my own recordings or bought ones) so that I can quickly search through everything.

I also like to divide those libraries so that I can search only within the sounds I recorded myself if necessary, or a library that would be specific to a project. To do so, right click in the Libraries section > Create new database. Name it, then right click on it > Add path to database.

You can then use the filter in the top right corner to search for keywords. This will also search through metadata if any. The options above the waveform display will let you select if you prefer to Auto Play (I usually do), match the project tempo (if working with midi files with embedded tempo data), or modify the pitch & volume.

Another very useful feature of the Media Explorer is importing only a section of a sound file by making a time selection in the waveform display. If the sound file you are previewing is quite long and you know you only want a small part of it, this feature allows to avoid both needlessly heavy sessions and losing yourself in long files in which the originally wanted sections become difficult to locate.
 

Save session as

I regularly save my sessions as, not only for safety (in case a session gets corrupted), but also in order to keep track of some progress of a specific design session, or when working on multiple variations of a similar thing.

• Saving versions
The first use is saving versions of one item. For example, if I am working on explosion sounds, I render the desired files from my project, implement them in a game or use them as needed, and then may decide to revisit and adjust those sounds. When going back into my ‘explosions’ session, I will start by saving it as, so that I am also able to go back to the previous version if I need to. I will equally name the rendered files accordingly (V1, V2, etc), so that I know exactly which ones relate to what project. This trick becomes especially useful when working in a team where your work will be shared or fedback on, and you may need to perform adjustments to a sound only to go back to a previous version afterwards.

• Multiple variations
The second use of saving as is when working on multiple variations of a similar event. For example, I was recently working on a series of reward chests opening sequences. There could be 3 to 5 different types of chests, and every one of these chest sequences are very detailed and contain many layers of sounds (and video). Designing all those sequences in one session can quickly become heavy and needlessly busy. It is also going to be much simpler when sharing sessions if each one is dedicated to a specific sequence.

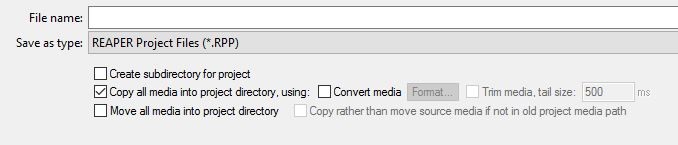
Since those sequences happen to share many of the same source sound files, I simply need to save as without creating a new subdirectory for project. This way, the same directory will be used and no audio files will be duplicated, only the Reaper project file will be different.

Click File > Save Project As… > Rename the session (.rpp), and do not tick Create subdirectory for project.

reaper session saving


Useful features


batch rendering

Batch Rendering

You can use the Reaper Batch File/Item Converter (File > Batch File/Item Converter or Ctrl+Shift+f) to render multiple files at once, using an FX chain if necessary.

This is extremely useful when working with non layered files (where you would use the Region render).
• Select the desired items to render (Right click + drag)
• In the Batch File window, click Add… > Add selected media items
• Set output directory
• Name files using wildcards if necessary
• Set file options and output format
• Click Convert all

The process takes only a few seconds even when rendering many files. I use this especially when working on dialog editing where you may have multiple versions of one event without having a layered design, and minimal effects (if any). You also have access to the same options as you would in the Render window such as rendering with markers or embedding project tempo.
 

Customize Lock options

By clicking on the Lock icon on the top left of the editor window, you activate the Lock options.

customize lock

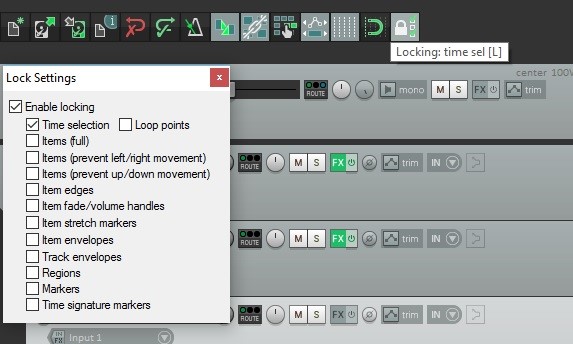
You can easily customize what those options are by right clicking the icon and ticking the desired ones. There are a few very handy options in there and it would be a mistake to underestimate them. For example, what I like to do is to tick Items (prevent left/right movement) so that I can easily move time sensitive items across tracks without fearing disrupting its placement on the timeline. In addition, setting an intuitive shortcut for Lock such as L allows me to simply hit L, move the needed item, and voilà. This simple feature can greatly improve workflow speed.
 

Customize Snap/Grid settings options

Right beside the Lock icon, you can find the Snap icon. Clicking this icon will activate the Snap options and, similarly to the Lock icon, right clicking it will allow you to customize its options.

snap to grid

There are many reasons why you would modify those options, especially when working with music and time sensitive composition, but one very useful thing to do when sound designing, is to set the Media items to snap at Snap both start/end.

The default behavior is to only snap at start/snap offset, but I found that quite annoying when working with loops or sound files that need to match a specific time in length. In these cases, you’d want to be able to snap the end of the item to the grid at 10 seconds for instance. Or, you may need to snap an item to both the start and the end of a time selection. This snap setting allows you to quickly and precisely do so.
 

Customize the Nudge/set items

You can access the Nudge/set items dialog box by right clicking on any item > Nudge/set items… or by going in the Item dropdown menu > Nudge/set items… or simply pressing N.

nudge items

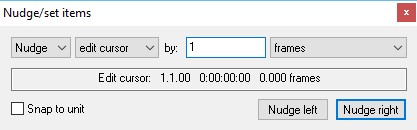
In this dialog box, you can determine what unit will be affected by nudging the edit cursor (or any of the other available options) left or right. Along with making sure that the actions Item edit: Nudge left by last nudge dialog settings and Item edit: Nudge right by last nudge dialog settings are respectively assigned to the left and right arrow shortcuts on the keyboard, this allows to quickly and precisely move the edit cursor according to your desired setting.

When sound designing, I find that the most likely use of nudging the cursor is when working with a video. In this case, the most precise way to do so would be by nudging the cursor by 1 frame left or right. You could however decide to rely on time (seconds/milliseconds), samples, item selection, or many other options.

This concludes this second article of a two part series on how to make the most of Reaper as a Sound Design tool. Without a doubt I could find dozens more useful feature to talk about, Reaper is genuinely full of them, but this roughly summarizes the ones I find myself using the most. Keep an eye on my website for more of these game audio and sound design tips and tricks.


Once again, a big thanks to Anne-Sophie Mongeau for her REAPER insights! If you missed the 1st part, it covers how to get started with REAPER.


Please share this:


About Anne-Sophie Mongeau
Anne-Sophie Mongeau is a game audio engineer at DIGIT Game Studios, and has a great blog about sound here. You can also meet her on Twitter here.


THE WORLD’S EASIEST WAY TO GET INDEPENDENT SOUND EFFECTS:
 
A Sound Effect gives you easy access to an absolutely huge sound effects catalog from a myriad of independent sound creators, all covered by one license agreement - a few highlights:

  • Bloody Nightmare is a modern horror cinematic library aimed at the most cutting edge bone chilling productions out there.

    Whether you work in sound design, as a composer, trailer editor or as an electronic musician, Bloody Nightmare is a valuable new wave of Horror sounds that will surely cause visceral moments of terror and dread!

    91 %
    OFF
  • Introducing MOTION GRAPHICS, a complete Motion Graphics sound effects library from SoundMorph!

    Motion Graphics focuses on all the elements you might need for sound design on a trailer, a cinematic scene or a visual that is heavy with motion graphics, whether it be abstract or straight forward, Motion Graphics has all the elements and textures you could think of. Motion Graphics are something all of us sound designers run into at one point or another, so this library is an excellent addition to your sound effects tool box.

    Motion Graphics was created by and in collaboration with sound designer Rostislav Trifonov (SoundMorph Elemental library contributor).

    Motion Graphics features 650 24bit/96 kHz .wav files, all meticulously embedded with Soundminer & Basehead metadata.

    The library features:

    • 450 + designed sound effects
    • 190 + source audio files
    • Whooshes
    • Impacts
    • Risers
    • Stingers
    • Low end and Sub Bass
    • Impulse Responses
    • Passbys
    • Textures – noise, grit, glitch
    • Ambiences
    • Buttons and Clicks
    • Mechanical Elements
    • Granular effects
    91 %
    OFF
  • ⏰ For a very limited time:
    Add this library to the cart and enter ah4launch in the cart coupon field – to sprinkle an extra launch discount, on top of the current discount!

    Animal Hyperrealism Vol IV is a sound library containing animal vocalisations, from real to designed creatures totaling more than 2000 individual sounds in 294 files. The sounds were recorded in zoos, and wildlife centers.

    The asset list includes but is not limited to: hippos, hyenas, vultures, dwarf mongooses, elephants, African cranes, parrots, tigers, pigmy hippos, rhea ostriches, brown bears, pheasants, wildebeests, African wild dogs and many more. The content has been recorded at 192KHz with a Sanken CO100K, an Avisoft CMPA and a Sennheiser 8050 for center plus two Sennheiser MKH8040 for stereo image.

    The resulting ultrasonic spectrum is rich and allows for truly extreme manipulation of the content.

    15 %
    OFF
Explore the full, unique collection here

Latest sound effects libraries:
 
  • A collection of 135 potion sound effects.

  • A collection of 140 individual power up ability sound effects.

  • A collection of 103 bowling sound effects.

  • São Miguel – Flows (supporter pack) is a collection that includes 14 looped files.
    The palette explores the sounds of the ocean, waterfalls, and hot springs. These recordings were captured in Moihnos (Cascata do Limbo, Praia dos Moihnos), Ribeira dos Caldeirões, Ponta do Arnel, and Furnas (Caldeira).
    Recorded in 96 kHz/24 bit, these sounds are easy to navigate and were captured using a Sony PCM D100.

  • ATTENTION: The audio preview only simulates gameplay to demo just a portion of the library’s content.


    Reward your players with the jackpot of 340 high-quality (170 original sounds), easy to use audio files that provide you with all the sports-themed audio your games will ever need!

    Create a casino masterpiece and a true immersion in your slots with this one-of-a-kind collection of royalty free sounds and music, expertly handcrafted to be a perfect fit for your games.


    ALL SLOT GAME ELEMENTS YOU WILL EVER NEED

    With numerous INTERFACE SOUNDS, such as REEL SPIN START BUTTONs, REEL SPINNING noises, REEL STOPs, BET INCREASE and DECREASE sounds, and all other interface buttons and TRANSITIONS, as well as WIN PAYOUT SOUNDs, such as short WIN TUNES, MUSICAL PAYOUT ROLLUP COUNTERs, SELECT and REVEAL jingles, various SYMBOL sounds, and FREE GAMES / FEATURE MUSIC LOOPs to fit any scene or situation (from strip-back relaxing background to upbeat catchy themes), this library is a perfect choice for your Online Video Slot, Mobile or even Land-based Casino Games!


    SPORTS-THEMED SOUNDS FOR YOUR FEATURE GAMES

    Need BASKETBALL game sounds, SOCCER / FOOTBALL, HOCKEY, BASEBALL, GOLF, TENNIS, TABLE TENNIS / PING PONG, SKIING / BOBSLED, SWIMMING or WATERPOLO, BOXING and even more? We got you covered!

    With all essential action and foley sounds for most common Oympic Sports that have been included in this pack, along with ambiences and miscellaneous sounds – such as AIR HORNS, ARENA AMBIENCES, CROWD CHEERING and CHANTING, JUDGE WHISTLE, and more – this sound effects library will leave nothing to be desired!


    ENGAGING SPORTS MUSIC IN ALL GENRES

    Immerse your players in gaming experience like no other with almost every music genre commonly found in sport events, games and tv program. We have also included multiple variations and edits to make your workflow as fast and easy as posible.

    From INDIE ROCK, HARD ROCK and METAL, to multiple sub-genres of ELECTRONIC Music, FUNK, ROCK BLUES and other genres, from SHORT STINGS, JINGLES and DROPS, to LOOPS, music mixes in VARIOUS INTENSITIES, included content here is a must have in your audio collection.


    With each audio file being drag-and-drop ready, presented in high quality MP3 and WAV formats with meticulously labelled keywords for your convienience, you will create the perfect gaming experience for your players in a matter of moments!


    So STEP UP YOUR SLOTS, GRAB ATTENTION and BUILD CONNECTION with YOUR PLAYERS! 

    DOWNLOAD NOW!


    SPORTS SLOTS at a Glance:

    • Symbol Sounds, Buttons and other Interface Sounds, Reel Spin and Stops, Trigger Sounds, Selection and Reveal sound effects, Music Loops for every scene and situation, Win Tunes and Rollups, Payouts and other short Celebration Tunes + much more!
    • Sports-Themed Feature Sounds: Basketball, Soccer / Football, Hockey, Baseball, Golf, Tennis, Table Tennis / Ping Pong, Skiing / Bobsled, Swimming, Waterpolo, Boxing and more
    • Numerous Variations and Edits of the assets, such as multiple lengths, intensities, looping and non-looping variants, and more;
    • Ready to use – requires no editing, labelling or splicing. Categorized, organized and individually labeled files for maximum use efficiency;
    • FREE Updates to higher versions, FOREVER!

    Enrich your slot IP in seconds with beautifully mixed, AAA quality sounds brought to you by our team of industry veterans, whose 1000+ slot games worth of experience have culminated in this extraordinary sound pack!


    DON’T DELAY any longer, you are only a step away from bringing your game to life. Take action and DOWNLOAD NOW!

    10 %
    OFF


Leave a Reply

Your email address will not be published. Required fields are marked *

HTML tags are not allowed.